Skip to content
New issue

Have a question about this project? Sign up for a free GitHub account to open an issue and contact its maintainers and the community.

By clicking “Sign up for GitHub”, you agree to our terms of service and privacy statement. We’ll occasionally send you account related emails.

Already on GitHub? Sign in to your account

单页面应用路由实现原理:以 React-Router 为例 #109

Open
youngwind opened this issue Aug 26, 2017 · 8 comments
Open

单页面应用路由实现原理:以 React-Router 为例 #109

youngwind opened this issue Aug 26, 2017 · 8 comments
Labels

Comments

@youngwind
Copy link
Owner

youngwind commented Aug 26, 2017

前言

2 年前我刚接触 react-router,觉得这玩意儿很神奇,只定义几个 Route 和 Link,就可以控制整个 React 应用的路由。不过那时候只想着怎么用它,也写过 2 篇与之相关的文章 #17 #73 (现在看来,那时候的文章写得实在是太差了)今天,我们来认真研究一番,希望能解决以下 3 个问题。

  1. 单页面应用路由的实现原理是什么?
  2. react-router 是如何跟 react 结合起来的?
  3. 如何实现一个简单的 react-router?

hash 的历史

最开始的网页是多页面的,后来出现了 Ajax 之后,才慢慢有了 SPA。然而,那时候的 SPA 有两个弊端:

  1. 用户在使用的过程中,url 不会发生任何改变。当用户操作了几步之后,一不小心刷新了页面,又会回到最开始的状态。
  2. 由于缺乏 url,不方便搜索引擎进行收录。

怎么办呢? → 使用 hash
url 上的 hash 本意是用来作锚点的,方便用户在一个很长的文档里进行上下的导航,用来做 SPA 的路由控制并非它的本意。然而,hash 满足这么一种特性:改变 url 的同时,不刷新页面,再加上浏览器也提供 onhashchange 这样的事件监听,因此,hash 能用来做路由控制。(这部分红宝书 P394 也有相关的说明)后来,这种模式大行其道,onhashchange 也就被写进了 HTML5 规范当中去了。

下面举个例子,演示“通过改变 hash 值,对页面进行局部刷新”,此例子出自前端路由实现与 react-router 源码分析, By joeyguo

<ul>
    <li><a href="#/">turn white</a></li>
    <li><a href="#/blue">turn blue</a></li>
    <li><a href="#/green">turn green</a></li>
</ul>
function Router() {
    this.routes = {};
    this.currentUrl = '';
}
Router.prototype.route = function (path, callback) {
    this.routes[path] = callback || function () {
        };
};
Router.prototype.refresh = function () {
    console.log('触发一次 hashchange,hash 值为', location.hash);
    this.currentUrl = location.hash.slice(1) || '/';
    this.routes[this.currentUrl]();
};
Router.prototype.init = function () {
    window.addEventListener('load', this.refresh.bind(this), false);
    window.addEventListener('hashchange', this.refresh.bind(this), false);
};
window.Router = new Router();
window.Router.init();
var content = document.querySelector('body');
// change Page anything
function changeBgColor(color) {
    content.style.backgroundColor = color;
}
Router.route('/', function () {
    changeBgColor('white');
});
Router.route('/blue', function () {
    changeBgColor('blue');
});
Router.route('/green', function () {
    changeBgColor('green');
});

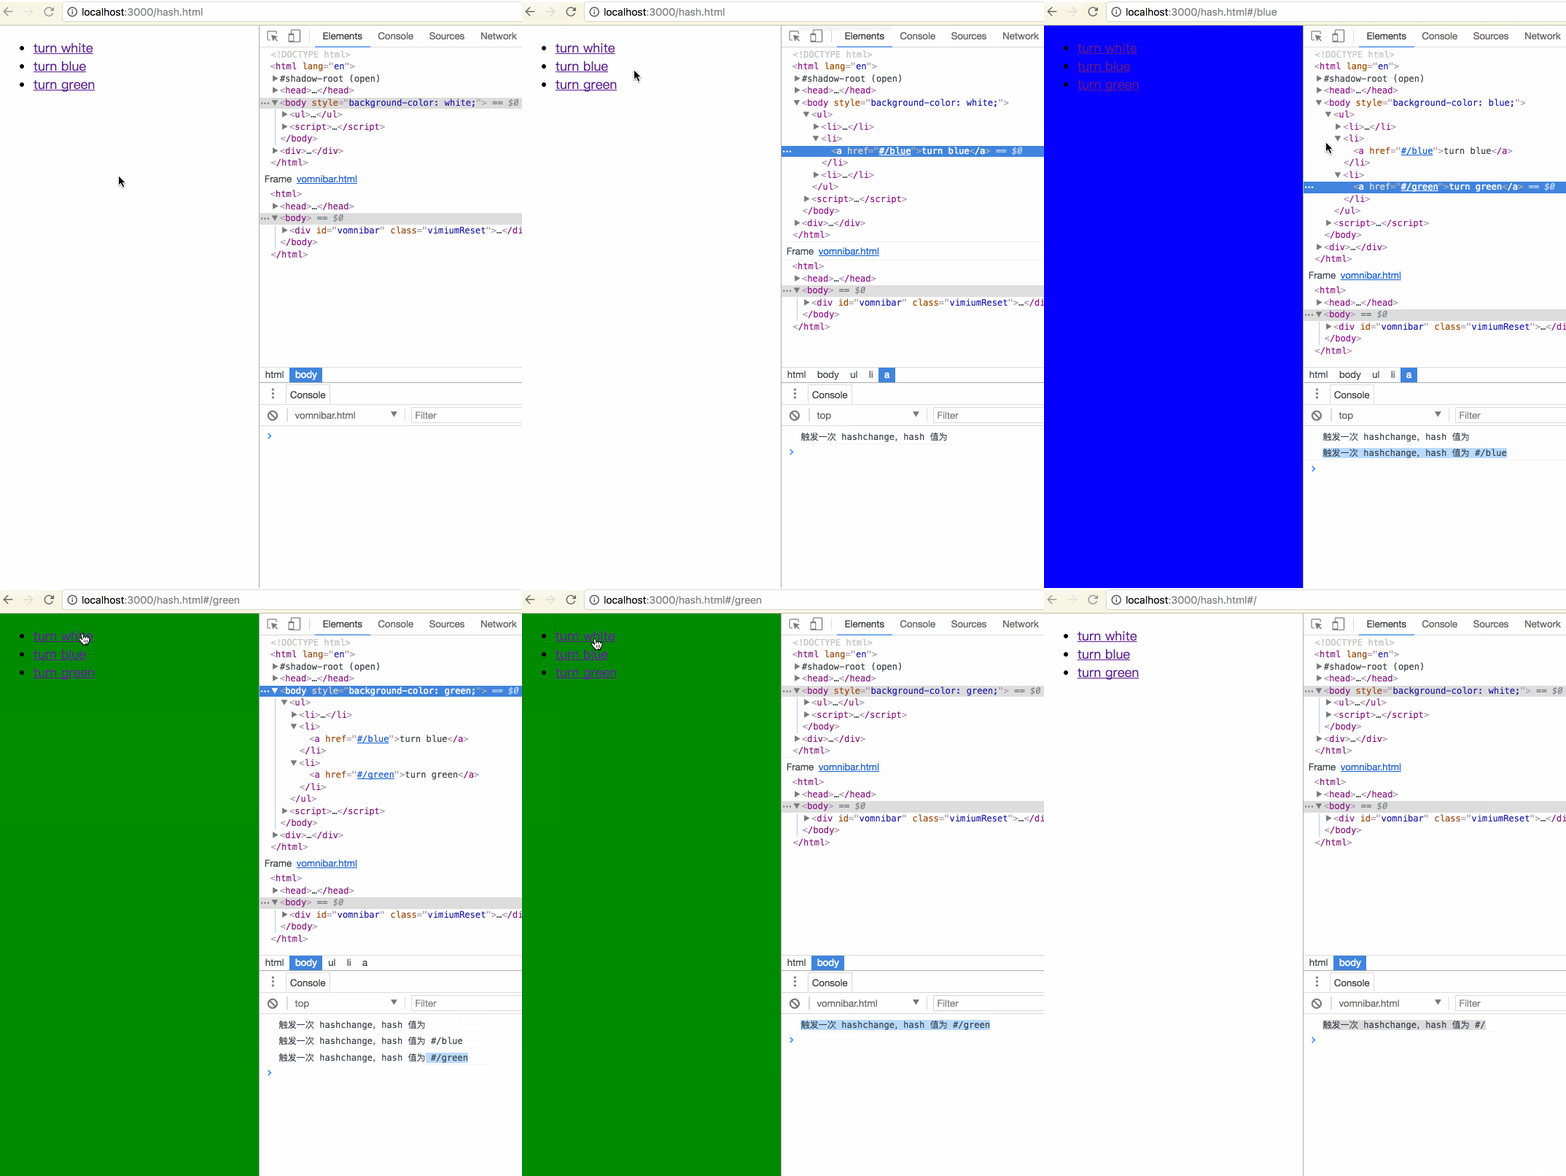
运行的效果如下图所示:
hash
由图中我们可以看到:的确可以通过 hash 的改变来对页面进行局部刷新。尤其需要注意的是:在第一次进入页面的时候,如果 url 上已经带有 hash,那么也会触发一次 onhashchange 事件,这保证了一开始的 hash 就能被识别。
问题:虽然 hash 解决了 SPA 路由控制的问题,但是它又引入了新的问题 → url 上会有一个 # 号,很不美观
解决方案:抛弃 hash,使用 history

history 的演进

很早以前,浏览器便实现了 history。然而,早期的 history 只能用于多页面进行跳转,比如:

// 这部分可参考红宝书 P215
history.go(-1);       // 后退一页
history.go(2);        // 前进两页
history.forward();     // 前进一页
history.back();      // 后退一页

在 HTML5 规范中,history 新增了以下几个 API

history.pushState();         // 添加新的状态到历史状态栈
history.replaceState();     // 用新的状态代替当前状态
history.state             // 返回当前状态对象

通过history.pushState或者history.replaceState,也能做到:改变 url 的同时,不会刷新页面。所以 history 也具备实现路由控制的潜力。然而,还缺一点:hash 的改变会触发 onhashchange 事件,history 的改变会触发什么事件呢? → 很遗憾,没有
怎么办呢?→ 虽然我们无法监听到 history 的改变事件,然而,如果我们能罗列出所有可能改变 history 的途径,然后在这些途径一一进行拦截,不也一样相当于监听了 history 的改变吗
对于一个应用而言,url 的改变只能由以下 3 种途径引起:

  1. 点击浏览器的前进或者后退按钮;
  2. 点击 a 标签;
  3. 在 JS 代码中直接修改路由

第 2 和第 3 种途径可以看成是一种,因为 a 标签的默认事件可以被禁止,进而调用 JS 方法。关键是第 1 种,HTML5 规范中新增了一个 onpopstate 事件,通过它便可以监听到前进或者后退按钮的点击。
要特别注意的是:调用history.pushStatehistory.replaceState并不会触发 onpopstate 事件。

总结:经过上面的分析,history 是可以用来进行路由控制的,只不过需要从 3 方面进行着手

React-Router v4

React-Router 的版本也是诡异,从 2 到 3 再到 4,每次的 API 变化都可谓翻天覆地,这次我们便以最新的 v4 进行举例。

const BasicExample = () => (
  <Router>
    <div>
      <ul>
        <li><Link to="/">Home</Link></li>
        <li><Link to="/about">About</Link></li>
        <li><Link to="/topics">Topics</Link></li>
      </ul>

      <hr/>

      <Route exact path="/" component={Home}/>
      <Route path="/about" component={About}/>
      <Route path="/topics" component={Topics}/>
    </div>
  </Router>
)

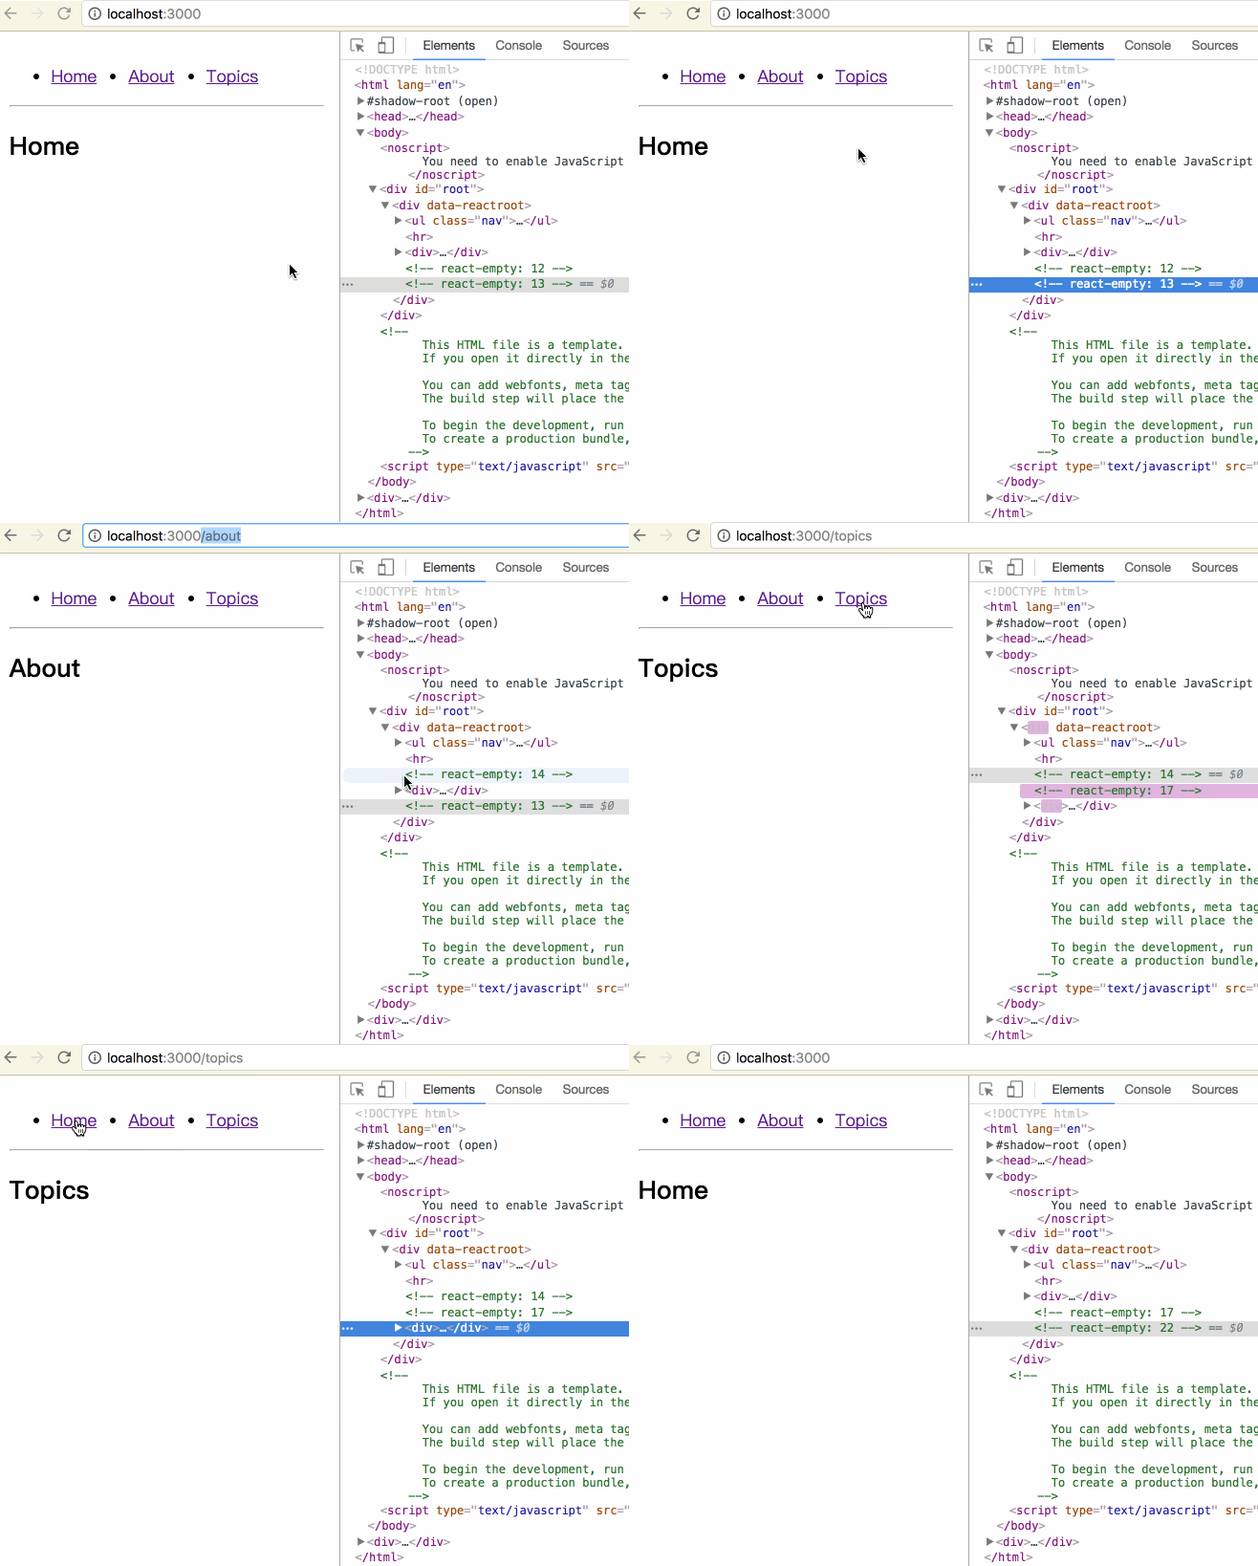
运行的实际结果如下图所示:
rrv4
由图中我们可以看出:所谓的局部刷新,其本质是:三个 comppnent 一直都在。当路由发生变化时,跟当前 url 匹配的 component 正常渲染;跟当前 url 不匹配的 component 渲染为 null,仅此而已,这其实跟 jQuery 时代的 show 和 hide 是一样的道理。现象我们已经观察到了,下面讨论实现思路。

思路分析

react router

代码实现

本文的思路分析和代码实现,参考了这篇文章:build-your-own-react-router-v4, By Tyler;也可以对照着看译文版本:由浅入深地教你开发自己的 React Router v4, By 胡子大哈。相对于参考文章而言,我主要做了以下两处改动:

  1. 原文在每个 Route 里面进行 onpopstate 的事件绑定,为了简单化,我把这部分去掉了,只给 onpopstate 绑定唯一一个事件,在该事件中循环 instance 数组,依次调用每个 Route 的 forceUpdate 方法;
  2. 导出了一个 jsHistory 对象,调用jsHistory.pushState方法就可以在 JS 中控制路由导航。
// App.js
import React, {Component} from 'react'
import {
    Route,
    Link,
    jsHistory
} from './mini-react-router-dom'

const App = () => (
    <div>
        <ul className="nav">
            <li><Link to="/">Home</Link></li>
            <li><Link to="/about">About</Link></li>
            <li><Link to="/topics">Topics</Link></li>
        </ul>

        <BtnHome/>
        <BtnAbout/>
        <BtnTopics/>
        <hr/>

        <Route exact path="/" component={Home}/>
        <Route path="/about" component={About}/>
        <Route path="/topics" component={Topics}/>
    </div>
);

const Home = () => (
    <div>
        <h2>Home</h2>
    </div>
);

const About = () => (
    <div>
        <h2>About</h2>
    </div>
);

const Topics = ({match}) => (
    <div>
        <h2>Topics</h2>
    </div>
);

class BtnHome extends Component {
    render() {
        return (
            <button onClick={jsHistory.pushState.bind(this, '/')}>Home</button>
        )
    }
}

class BtnAbout extends Component {
    render() {
        return (
            <button onClick={jsHistory.pushState.bind(this, '/about')}>About</button>
        )
    }
}

class BtnTopics extends Component {
    render() {
        return (
            <button onClick={jsHistory.pushState.bind(this, '/topics')}>Topics</button>
        )
    }
}

export default App
// mini-react-router-dom.js
import React, {Component, PropTypes} from 'react';

let instances = [];  // 用来存储页面中的 Router
const register = (comp) => instances.push(comp);
const unRegister = (comp) => instances.splice(instances.indexOf(comp), 1);

const historyPush = (path) => {
    window.history.pushState({}, null, path);
    instances.forEach(instance => instance.forceUpdate())
};

window.addEventListener('popstate', () => {
    // 遍历所有 Route,强制重新渲染所有 Route
    instances.forEach(instance => instance.forceUpdate());
});

// 判断 Route 的 path 参数与当前 url 是否匹配
const matchPath = (pathname, options) => {
    const {path, exact = false} = options;
    const match = new RegExp(`^${path}`).exec(pathname);
    if (!match) return null;
    const url = match[0];
    const isExact = pathname === url;
    if (exact && !isExact) return null;
    return {
        path,
        url
    }
};

export class Link extends Component {
    static propTypes = {
        to: PropTypes.string
    };

    handleClick = (event) => {
        event.preventDefault();
        const {to} = this.props;
        historyPush(to);
    };

    render() {
        const {to, children} = this.props;
        return (
            <a href={to} onClick={this.handleClick}>
                {children}
            </a>
        )
    }
}

export class Route extends Component {
    static propTypes = {
        path: PropTypes.string,
        component: PropTypes.func,
        exact: PropTypes.bool
    };

    componentWillMount() {
        register(this);
    }

    render() {
        const {path, component, exact} = this.props;
        const match = matchPath(window.location.pathname, {path, exact});

        // Route 跟当前 url 不匹配,就返回 null
        if (!match) return null;

        if (component) {
            return React.createElement(component);
        }
    }

    componentWillUnMount() {
        unRegister(this);
    }
}

// 这里之所以要导出一个 jsHistory,
// 是为了方便使用者在 JS 中直接控制导航
export const jsHistory = {
    pushState: historyPush
};

实现的效果如下图所示:
demo

参考资料

本文涉及到代码可以参考这个仓库

  1. Build your own React Router v4, By Tyler
  2. 由浅入深地教你开发自己的 React Router v4, By 胡子大哈
  3. 前端路由实现与 react-router 源码分析, By joeyguo
  4. react-router 2.7.0源码深度分析, By 朱建

---------- 完 -------------

@youngwind youngwind changed the title 单页面路由实现原理:以 React-Router 为例 单页面应用路由实现原理:以 React-Router 为例 Aug 26, 2017
@helloyxw
Copy link

“在第一次进入页面的时候,也会触发一次 onhashchange 事件,这保证了一开始的 hash 就能被识别。” 这句应该是错误的,页面在第一次加载时并不会触发hashchang事件,只有改变了hash值后才会触发。

@youngwind
Copy link
Owner Author

@helloyxw 此处确实没有表述清楚,多谢指正。

@zeromake
Copy link

zeromake commented Jan 9, 2018

最近在用preact做东西发现preact-router不支持路由切换动画,不支持子路由。
preact-router的方式是用Router把children遍历匹配url然后过滤掉。
博主的模式是全靠Route这个组件来匹配路由,但是这样就完全无法支持路由切换动画,子路由了。
动画组件是通过children的减少增加来触发动画的,除非Route内置动画功能。

现在我是把preact-router抄到项目里改造了,其中的children过滤感觉还是不够给力,顺便帮忙看看怎么优化。后面是打算把这个抽出来作为一个单独的项目,也不知道要不要去搞个pr,源码全部用typescript写过,还做了react兼容。

@LiuL0703
Copy link

LiuL0703 commented Jan 5, 2019

“三个 comppnent 一直都在...”
打错词了,应该是component吧

@icantunderstand
Copy link

@Ripple07
Copy link

Ripple07 commented Mar 9, 2020

window.addEventListener('popstate', () => {
// 遍历所有 Route,强制重新渲染所有 Route
instances.forEach(instance => instance.forceUpdate());
});

这个监听是为了做什么?原来以为是为了监听pushState,但MDN上提到:Note that just calling history.pushState() or history.replaceState() won't trigger a popstate event. 所以有点不理解这个监听是为了哪种场景? @youngwind

@ZJH9Rondo
Copy link

window.addEventListener('popstate', () => {
// 遍历所有 Route,强制重新渲染所有 Route
instances.forEach(instance => instance.forceUpdate());
});

这个监听是为了做什么?原来以为是为了监听pushState,但MDN上提到:Note that just calling history.pushState() or history.replaceState() won't trigger a popstate event. 所以有点不理解这个监听是为了哪种场景? @youngwind

这就是为了监听,手动点击浏览器的回退和前进按钮 这两种情况的,MDN说明的这个,结合题主说的,我的理解是:popState 能触发回调,你在回调里面处理路由变化的逻辑;但是你调用 history.pushState 和 replaceState,是不会触发 popState的,不会形成环路

@xiaohutongxue2
Copy link

最近在用preact做东西发现preact-router不支持路由切换动画,不支持子路由。
preact-router的方式是用Router把children遍历匹配url然后过滤掉。
博主的模式是全靠Route这个组件来匹配路由,但是这样就完全无法支持路由切换动画,子路由了。
动画组件是通过children的减少增加来触发动画的,除非Route内置动画功能。

现在我是把preact-router抄到项目里改造了,其中的children过滤感觉还是不够给力,顺便帮忙看看怎么优化。后面是打算把这个抽出来作为一个单独的项目,也不知道要不要去搞个pr,源码全部用typescript写过,还做了react兼容。

前言

2 年前我刚接触 react-router,觉得这玩意儿很神奇,只定义几个 Route 和 Link,就可以控制整个 React 应用的路由。不过那时候只想着怎么用它,也写过 2 篇与之相关的文章 #17 #73 (现在看来,那时候的文章写得实在是太差了)今天,我们来认真研究一番,希望能解决以下 3 个问题。

  1. 单页面应用路由的实现原理是什么?
  2. react-router 是如何跟 react 结合起来的?
  3. 如何实现一个简单的 react-router?

hash 的历史

最开始的网页是多页面的,后来出现了 Ajax 之后,才慢慢有了 SPA。然而,那时候的 SPA 有两个弊端:

  1. 用户在使用的过程中,url 不会发生任何改变。当用户操作了几步之后,一不小心刷新了页面,又会回到最开始的状态。
  2. 由于缺乏 url,不方便搜索引擎进行收录。

怎么办呢? → 使用 hash
url 上的 hash 本意是用来作锚点的,方便用户在一个很长的文档里进行上下的导航,用来做 SPA 的路由控制并非它的本意。然而,hash 满足这么一种特性:改变 url 的同时,不刷新页面,再加上浏览器也提供 onhashchange 这样的事件监听,因此,hash 能用来做路由控制。(这部分红宝书 P394 也有相关的说明)后来,这种模式大行其道,onhashchange 也就被写进了 HTML5 规范当中去了。

下面举个例子,演示“通过改变 hash 值,对页面进行局部刷新”,此例子出自前端路由实现与 react-router 源码分析, By joeyguo

<ul>
    <li><a href="#/">turn white</a></li>
    <li><a href="#/blue">turn blue</a></li>
    <li><a href="#/green">turn green</a></li>
</ul>
function Router() {
    this.routes = {};
    this.currentUrl = '';
}
Router.prototype.route = function (path, callback) {
    this.routes[path] = callback || function () {
        };
};
Router.prototype.refresh = function () {
    console.log('触发一次 hashchange,hash 值为', location.hash);
    this.currentUrl = location.hash.slice(1) || '/';
    this.routes[this.currentUrl]();
};
Router.prototype.init = function () {
    window.addEventListener('load', this.refresh.bind(this), false);
    window.addEventListener('hashchange', this.refresh.bind(this), false);
};
window.Router = new Router();
window.Router.init();
var content = document.querySelector('body');
// change Page anything
function changeBgColor(color) {
    content.style.backgroundColor = color;
}
Router.route('/', function () {
    changeBgColor('white');
});
Router.route('/blue', function () {
    changeBgColor('blue');
});
Router.route('/green', function () {
    changeBgColor('green');
});

运行的效果如下图所示:
hash
由图中我们可以看到:的确可以通过 hash 的改变来对页面进行局部刷新。尤其需要注意的是:在第一次进入页面的时候,如果 url 上已经带有 hash,那么也会触发一次 onhashchange 事件,这保证了一开始的 hash 就能被识别。
问题:虽然 hash 解决了 SPA 路由控制的问题,但是它又引入了新的问题 → url 上会有一个 # 号,很不美观
解决方案:抛弃 hash,使用 history

history 的演进

很早以前,浏览器便实现了 history。然而,早期的 history 只能用于多页面进行跳转,比如:

// 这部分可参考红宝书 P215
history.go(-1);       // 后退一页
history.go(2);        // 前进两页
history.forward();     // 前进一页
history.back();      // 后退一页

在 HTML5 规范中,history 新增了以下几个 API

history.pushState();         // 添加新的状态到历史状态栈
history.replaceState();     // 用新的状态代替当前状态
history.state             // 返回当前状态对象

通过history.pushState或者history.replaceState,也能做到:改变 url 的同时,不会刷新页面。所以 history 也具备实现路由控制的潜力。然而,还缺一点:hash 的改变会触发 onhashchange 事件,history 的改变会触发什么事件呢? → 很遗憾,没有
怎么办呢?→ 虽然我们无法监听到 history 的改变事件,然而,如果我们能罗列出所有可能改变 history 的途径,然后在这些途径一一进行拦截,不也一样相当于监听了 history 的改变吗
对于一个应用而言,url 的改变只能由以下 3 种途径引起:

  1. 点击浏览器的前进或者后退按钮;
  2. 点击 a 标签;
  3. 在 JS 代码中直接修改路由

第 2 和第 3 种途径可以看成是一种,因为 a 标签的默认事件可以被禁止,进而调用 JS 方法。关键是第 1 种,HTML5 规范中新增了一个 onpopstate 事件,通过它便可以监听到前进或者后退按钮的点击。
要特别注意的是:调用history.pushStatehistory.replaceState并不会触发 onpopstate 事件。

总结:经过上面的分析,history 是可以用来进行路由控制的,只不过需要从 3 方面进行着手

React-Router v4

React-Router 的版本也是诡异,从 2 到 3 再到 4,每次的 API 变化都可谓翻天覆地,这次我们便以最新的 v4 进行举例。

const BasicExample = () => (
  <Router>
    <div>
      <ul>
        <li><Link to="/">Home</Link></li>
        <li><Link to="/about">About</Link></li>
        <li><Link to="/topics">Topics</Link></li>
      </ul>

      <hr/>

      <Route exact path="/" component={Home}/>
      <Route path="/about" component={About}/>
      <Route path="/topics" component={Topics}/>
    </div>
  </Router>
)

运行的实际结果如下图所示:
rrv4
由图中我们可以看出:所谓的局部刷新,其本质是:三个 comppnent 一直都在。当路由发生变化时,跟当前 url 匹配的 component 正常渲染;跟当前 url 不匹配的 component 渲染为 null,仅此而已,这其实跟 jQuery 时代的 show 和 hide 是一样的道理。现象我们已经观察到了,下面讨论实现思路。

思路分析

react router

代码实现

本文的思路分析和代码实现,参考了这篇文章:build-your-own-react-router-v4, By Tyler;也可以对照着看译文版本:由浅入深地教你开发自己的 React Router v4, By 胡子大哈。相对于参考文章而言,我主要做了以下两处改动:

  1. 原文在每个 Route 里面进行 onpopstate 的事件绑定,为了简单化,我把这部分去掉了,只给 onpopstate 绑定唯一一个事件,在该事件中循环 instance 数组,依次调用每个 Route 的 forceUpdate 方法;
  2. 导出了一个 jsHistory 对象,调用jsHistory.pushState方法就可以在 JS 中控制路由导航。
// App.js
import React, {Component} from 'react'
import {
    Route,
    Link,
    jsHistory
} from './mini-react-router-dom'

const App = () => (
    <div>
        <ul className="nav">
            <li><Link to="/">Home</Link></li>
            <li><Link to="/about">About</Link></li>
            <li><Link to="/topics">Topics</Link></li>
        </ul>

        <BtnHome/>
        <BtnAbout/>
        <BtnTopics/>
        <hr/>

        <Route exact path="/" component={Home}/>
        <Route path="/about" component={About}/>
        <Route path="/topics" component={Topics}/>
    </div>
);

const Home = () => (
    <div>
        <h2>Home</h2>
    </div>
);

const About = () => (
    <div>
        <h2>About</h2>
    </div>
);

const Topics = ({match}) => (
    <div>
        <h2>Topics</h2>
    </div>
);

class BtnHome extends Component {
    render() {
        return (
            <button onClick={jsHistory.pushState.bind(this, '/')}>Home</button>
        )
    }
}

class BtnAbout extends Component {
    render() {
        return (
            <button onClick={jsHistory.pushState.bind(this, '/about')}>About</button>
        )
    }
}

class BtnTopics extends Component {
    render() {
        return (
            <button onClick={jsHistory.pushState.bind(this, '/topics')}>Topics</button>
        )
    }
}

export default App
// mini-react-router-dom.js
import React, {Component, PropTypes} from 'react';

let instances = [];  // 用来存储页面中的 Router
const register = (comp) => instances.push(comp);
const unRegister = (comp) => instances.splice(instances.indexOf(comp), 1);

const historyPush = (path) => {
    window.history.pushState({}, null, path);
    instances.forEach(instance => instance.forceUpdate())
};

window.addEventListener('popstate', () => {
    // 遍历所有 Route,强制重新渲染所有 Route
    instances.forEach(instance => instance.forceUpdate());
});

// 判断 Route 的 path 参数与当前 url 是否匹配
const matchPath = (pathname, options) => {
    const {path, exact = false} = options;
    const match = new RegExp(`^${path}`).exec(pathname);
    if (!match) return null;
    const url = match[0];
    const isExact = pathname === url;
    if (exact && !isExact) return null;
    return {
        path,
        url
    }
};

export class Link extends Component {
    static propTypes = {
        to: PropTypes.string
    };

    handleClick = (event) => {
        event.preventDefault();
        const {to} = this.props;
        historyPush(to);
    };

    render() {
        const {to, children} = this.props;
        return (
            <a href={to} onClick={this.handleClick}>
                {children}
            </a>
        )
    }
}

export class Route extends Component {
    static propTypes = {
        path: PropTypes.string,
        component: PropTypes.func,
        exact: PropTypes.bool
    };

    componentWillMount() {
        register(this);
    }

    render() {
        const {path, component, exact} = this.props;
        const match = matchPath(window.location.pathname, {path, exact});

        // Route 跟当前 url 不匹配,就返回 null
        if (!match) return null;

        if (component) {
            return React.createElement(component);
        }
    }

    componentWillUnMount() {
        unRegister(this);
    }
}

// 这里之所以要导出一个 jsHistory,
// 是为了方便使用者在 JS 中直接控制导航
export const jsHistory = {
    pushState: historyPush
};

实现的效果如下图所示:
demo

参考资料

本文涉及到代码可以参考这个仓库

  1. Build your own React Router v4, By Tyler
  2. 由浅入深地教你开发自己的 React Router v4, By 胡子大哈
  3. 前端路由实现与 react-router 源码分析, By joeyguo
  4. react-router 2.7.0源码深度分析, By 朱建

---------- 完 -------------

Sign up for free to join this conversation on GitHub. Already have an account? Sign in to comment
Labels
Projects
None yet
Development

No branches or pull requests

8 participants