Preparation
-
Install python (version≥ 3.6, such as Anaconda3-5.2.0-Windows-x86_64.exe)
-
Install pyserial library (version 3.5)
Run script
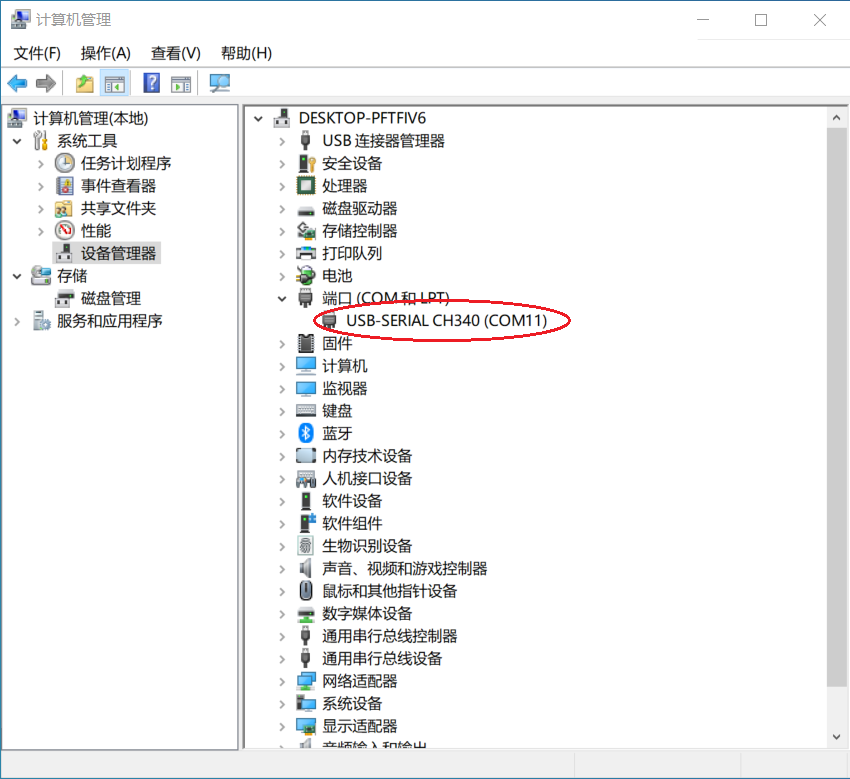
The script program will automatically identify the serial port number at the very beginning of the run, and complete the connection.
Generally, when using a USB adapter to connect to Nybble (or Bittle), there is only one serial port number:
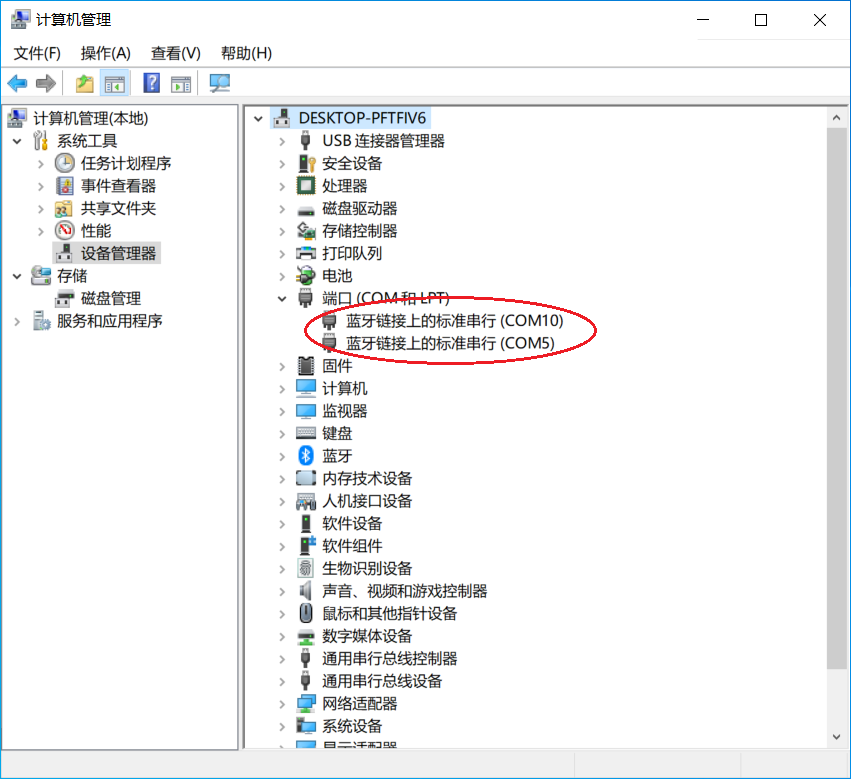
When using the Bluetooth module, there are two serial port numbers:
Open Terminal (such as Anaconda Prompt), enter the path where the script is located (***\serialMaster), you can use the following command to run the script:
Method 1: Run the ardSerial.py
***\serialMaster>python3 ardSerial.py kbalance
Parameters: kbalance is a serial port command representing Nybble (or Bittle) skills.
Of course, you can also run this script without any parameters:
***\serialMaster>python3 ardSerial.py
When the system recognizes that there are multiple serial port numbers, the script will print out the following prompt message at the very beginning of the run:
If there is no response after you input the serial command in the terminal, you should close the terminal first, then change the value of "bluetoothPortIndex" in the ardSerial.py (line:128)to connect to another blue tooth serial port, then reopen the terminal and rerun the script.
When the script formally starts running, the following prompt information is printed out: You can type 'quit' or 'q' to exit.
Next, you can enter serial port commands in Terminal to control Nybble (or Bittle) to do various interesting actions e.g.
kbalance # Command to control Nybble(or Bittle) to stand normally
m 0 -30 0 30 # Command to control Nybble(or Bittle) head to swing left and right
Method 2: Run a custom script, e.g. example.py
***\serialMaster>python3 example.py
The list testSchedule in example.py is used to test various serial port commands. Run the following script code to see the execution effect of each serial port command in the list:
for task in testSchedule: wrapper(task)
You can also refer to the content of the stepUpSchedule list (in***\serialMaster\demos\stepup.py), write a list of behaviors according to your actual needs, and realize your creativity.
Note: When running the scripts under the path "\serialMaster\demos"*, you must first use the "cd demos" command to enter the path where the scripts are located (\serialMaster\demos), and then use the python3 command to run the script. e.g. ***\serialMaster\demos>python3 stepup.py
Explanation of the serial port commands in the listtestSchedule:
['kbalance', 2]
- 'kbalance' indicates the command to control Bittle to stand normally
- 2 indicates the postponed time after finishing the command, in seconds
['m', [0, -20], 1.5]
- m indicates the command to control the rotation of the joint servo
- 0 indicates the index number of joint servo
- -20 indicates the rotation angle (this angle refers to the origin, rather than additive) the unit is degree
- 1.5 indicates the postponed time after finishing the command, in seconds. It can be a float number
['m', ['m', '0', '45', '0', '-45', '0', '45', '0', '-45'], 2]
Using this format, multiple joint servo rotation commands can be issued at one time, and these joint servo rotation commands are executed SEQUENTIALLY, not at the same time. The meaning of this example is: the joint servo with index number 0 is first rotated to the 45 degree position, and then rotated to the -45 degree position, and so on. After these motion commands are completed, the next command will be executed after a 2-second delay.
['M', ['M', '8', '-15', '9', '-20'], 2]
Using this format, multiple joint servo rotation commands can be issued at one time, and these joint servo rotation commands are executed AT THE SAME TIME. The meaning of this example is the joint servos with index numbers 8, 9 are rotated to the -15, -20 degree positions at the same time. After these motion commands are completed, the next command will be executed after a 2-second delay.
['d', 2]
- d indicates the command to put the robot down and shut down the servos
- 2 indicates the postponed time after finishing the command, in seconds
['c', 2]
- c indicates the command to enter calibration mode
- 2 indicates the postponed time after finishing the command, in seconds. After these motion commands are completed, the next command will be executed after a 2-second delay.
['c', [0, -9], 2]
- c indicates the command to enter calibration mode
- 0 indicates the index number of joint servo
- -9 indicates the rotation angle, the unit is degree
- 2 indicates the postponed time after finishing the command, in seconds
Using this format, you can enter the calibration mode to calibrate the angle of a certain joint servo. Note: If you want the correction value in this command to take effect, you need to enter the "**s"**command after executing this command. The meaning of this example: the joint servo with serial number 0 rotates -9 degrees. After these motion commands are completed, the next command will be executed after a 2-second delay.
['i', [8, 50, 9, 50, 10, 50, 11, 50, 0, 0], 3]
- i indicates the command to rotate multiple joint servos at the same time
- 8, 9, 10, 11, 0 indicate the index numbers of joint servos
- 50, 50, 50, 50, 0 indicate the rotation angle (this angle refers to the origin, rather than additive ), the unit is degree
- 3 indicates the postponed time after finishing the command, in seconds
['l', [20, 0, 0, 0, 0, 0, 0, 0, 45, 45, 45, 45, 36, 36, 36, 36], 5]
- l indicates the command to control all joint servos to rotate at the same time (currently the command supports 16 degrees of freedom, that is, 16 servos)
- 20,0,0,0,0,0,0,0,45,45,45,45,36,36,36,36 indicate the rotation angle of each joint servo corresponding to 0-15 (this angle refers to the origin, rather than additive), the unit is degree
- 5 indicates the postponed time after finishing the command, in seconds
['b', [10, 255], 2]
- b indicates the command to control the buzzer to beep
- 10 indicates the music tone
- 255 indicates the lengths of duration, the value range is 0~255
- 2 indicates the postponed time after completing the pronunciation, in seconds
['b', ['b', '14', '90', '14', '90', '21', '90', '21', '90', ‘23', '90', '23', '90', '21', '180'], 5]
- b indicates the command to control the buzzer to beep
- '14', '14', '21', '21', ‘23', '23', '21' indicate the music tones
- '90', '90', '90', '90', '90', '90', '180' indicates the lengths of duration
- 5 indicates the postponed time after the music melody is played, in seconds
Using this format, multiple tone pronunciation commands can be issued at one time, and a simple melody can be played. The meaning of this example is: play a simple melody, and delay 5 seconds after the music melody is played.
For the description of other serial port commands, please refer to Chapter 7 of the Petoi Bittle User Manuals: 7 🕹 Play with Bittle
Please help Nybble and Bittle find their sparks. Wish you have fun!