Pico-Go enables you to communicate with your Raspberry Pi Pico board using the built-in command line REPL. Run a single file to your board, sync your entire project or directly type and execute commands.
This software is a derivative product of Pymakr by Pycom Ltd under the terms of its GNU GPL Version 3+ license.
- Works with macOS, Linux, and Windows.
- Connects to the Raspberry Pi Pico board.
To find out what's new, take a look at the changelog.
This two-part series will get you going with development for the Pico in MicroPython using VS Code:
- NodeJS installed on your system (6.9.5 or higher)
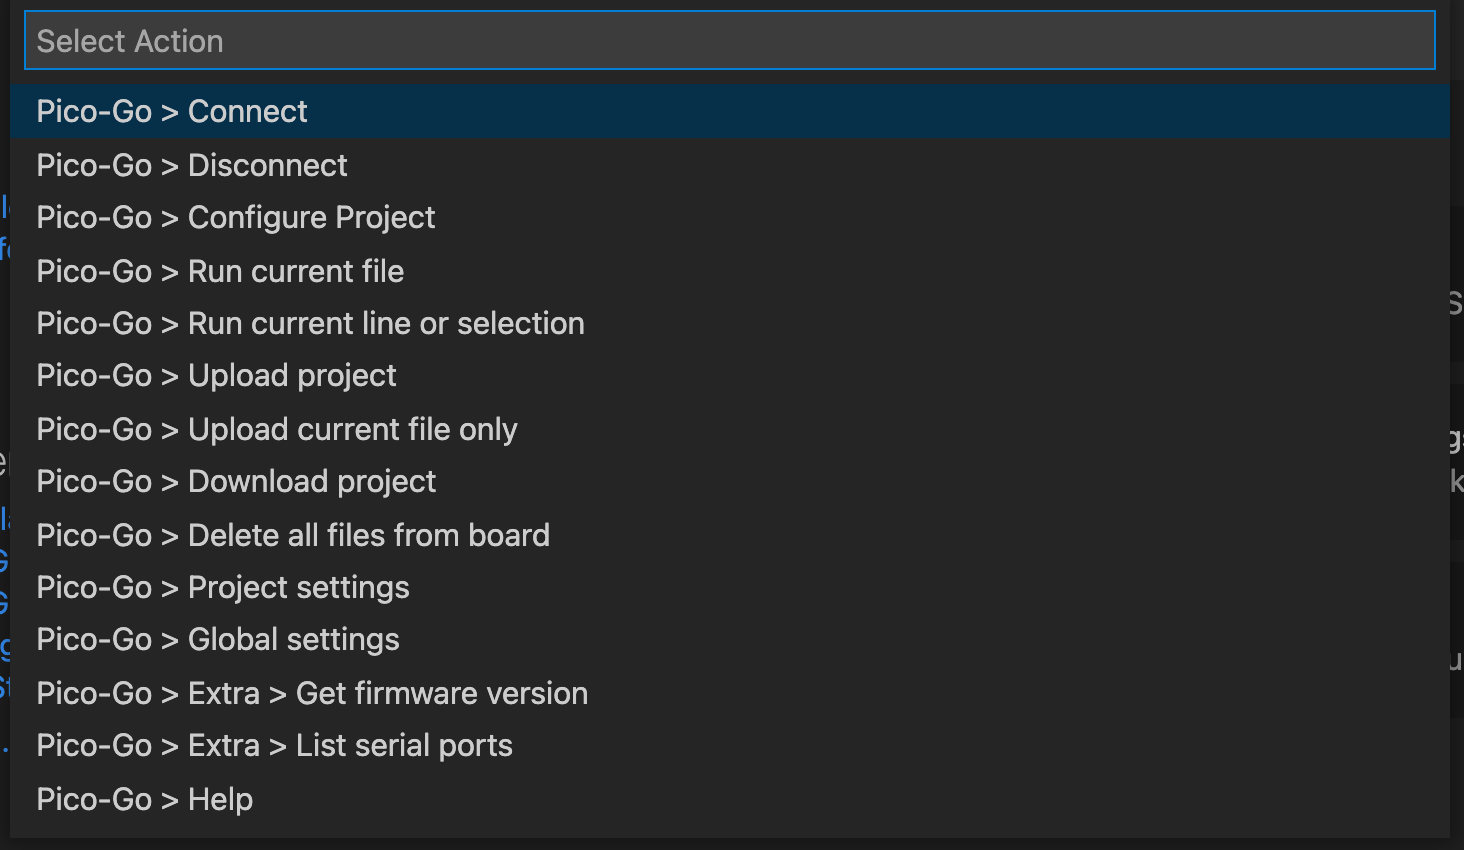
The extension will default the board settings for the Pico. If you want to change anything, use the Pico-Go > Global settings or Pico-Go > Project settings command to setup your connection. After changing the settings, use the Connect command to connect using the new settings.
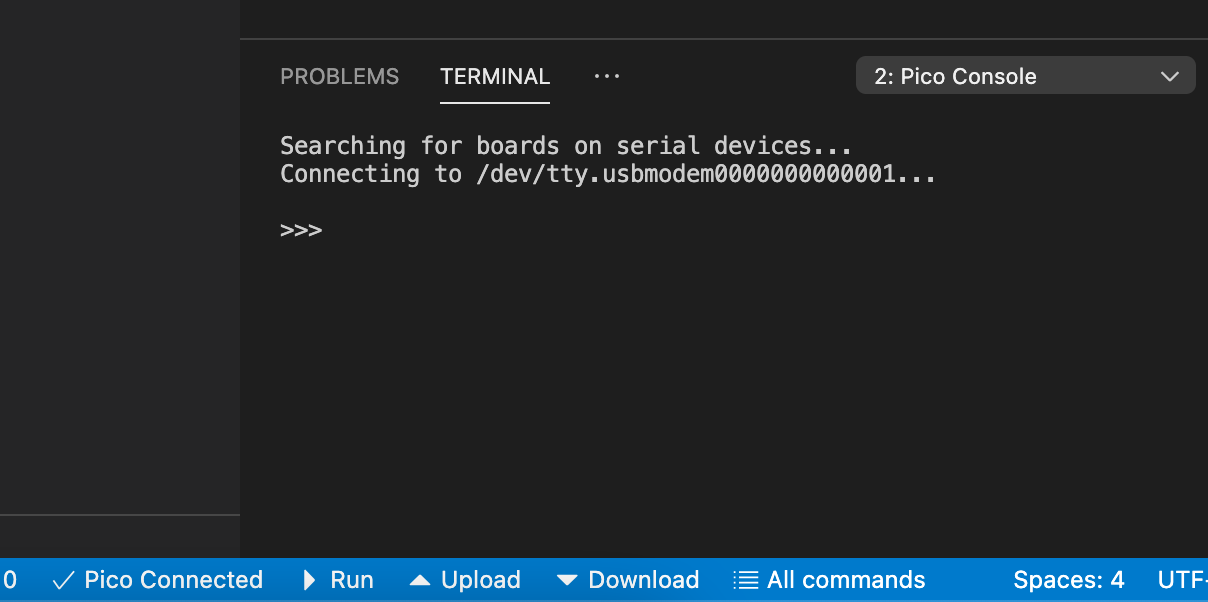
At any time, use the Pico Disconnected / Pico Connected button on the bottom-left of the Code status bar to toggle the terminal. When closing, the board is disconnected, indicated by the x icon in the button. When manually closing the terminal (x on the right top of the terminal) the connection stays active.
| Action | Windows / Linux | macOS |
|---|---|---|
| (Re)connect | ctrl-shift-c |
command-shift-c |
| Global settings | ctrl-shift-g |
command-shift-g |
| Upload project | ctrl-shift-u |
command-shift-u |
| Upload current file only | ctrl-shift-f |
command-shift-f |
| Run current file | ctrl-shift-r |
command-shift-r |
| Run current line | ctrl-shift-enter |
command-shift-enter |
To connect to your board, use the Global settings command to go to the extensions settings.
If you want to synchronize a subfolder of your project instead of the entire project, enter the name of the subfolder in the sync_folder field.
Please refer to Settings for a list of all the settings.
Using the REPL is easy and works the same way as your serial connection to your board. Type any micro-python command, use tab to auto-complete, arrow keys to go back in history and any of the following commands:
CTRL-B: Enter friendly REPLCTRL-C: Stop any running codeCTRL-D: Soft resetCTRL-E: Paste modeCTRL-F: Safe boot
Ctrl-C and Ctrl-V (or Command-C / Command-V on a Mac) can also be used to copy and paste in the console.
The Run Selection command will run the code on the current line in the active editor, to the connected board using paste-mode. If a block of code is selected, it will run the (first) selected block.
This can be used to step though your code on a line-by-line basis, and allows you to inspect and debug your code.
If the selected line of block of code is idented, as is often the case, it will be de-idented based on the first selected line. so if the first selected line is idented with 8 spaces, all lines will have 8 leading spaces removed. If you have lines with irregular identing, these lines will be trimmed, and a warning comment added.
As Paste-Mode is used, you will see both your code , as well as the output in the terminal.
The sync command will synchronize all files in your project to the board. Make sure you have a main.py file in your project if you want to make sure your board will run properly upon startup. After synchronizing, the board will be reset.
If you want to sync only a certain folder in your project, use the sync_folder field in the settings and add the folder name.
By default, only the following file types are synchronized: py,txt,log,json,xml,html,js,css,mpy. This can be changed using the sync_file_types field in the settings.
The sync limit is set to 350kb. If your sync folder contains more than that, the plugin will refuse to sync.
Synchronizing takes a bit of memory, so this error can occur when code running on the board already is taking a substantial amount of memory.
Solution: use safe boot with REPL when synchronizing.
If the Pico-Go terminal is not opening or giving an error, this might be because NodeJS is not installed on your system. This is because the terminal process is running separate from VSCode and depends on your systems NodeJS install.
Solution: Install NodeJS. For windows 64 machines, install a 32 bit version of nodejs (for example nvm install 7.8.0 32 when using nvm).
If you're a linux user and can't connect to your board, there might be a permission issue to access the serial port.
Solution: Run the following command sudo usermod -a -G dialout $USER
If you want to contribute to this project you can test the app the following way:
- Download the code or clone the repo
- Install Babel by running
npm install --save-dev babel-core - On non-Windows machines, ensure PowerShell is installed, e.g. on a Mac
brew install --cask powershell - Rebuild using
npm rebuild - Open the folder in VSC
- Ensure
.vscode/launch.jsonhas aruntimeExecutablevalue suitable for your machine, e.g. on a Mac/Users/chris/source/repos/Pico-Go/node_modules/electron/dist/Electron.app/Contents/MacOS/Electron - Ensure
.vscode/launch.jsonhas aprogramvalue suitable for your machine. - From the command palette,
Tasks: Run build taskto run the babel builder - From the debug panel, start
Launch Extension.
If you receive a warning from MacOS about not being able to access bindings.node because it hasn't been signed by a developer, cancel the notification and then go to System Preferences > Security & Privacy > General and click the Allow button. Then try again.
Note: make sure you have the 'code' terminal command installed. See code setup for Mac
- Install the vscode publishing tool by running
npm install -g vsce - Create a .vsix package by running
vsce package - you can then install the .vsix package by running
code --install-extension Pico-Go-1.x.y.vsix
Pretty much 99.9% of the code in this repo is from the fantastic Pymakr project.
Whilst the out-of-the-box version of Pymakr can talk to a Pico board after a little initial configuration, it makes certain assumptions about the capabilities of the board. For example, when transferring files, it attempts to calculate file hashes to check the file has copied correctly. The Python module that it attempts to use for this isn't available on the Pico, so uploading or downloading fails.
There were two options available: change the existing Pymakr project so it could work with another manufacturer's board - i.e. add checks to detect whether a capability was available on the board before attempting an action - or create a derivative product.
It didn't seem right or fair to place the burden of supporting third party boards on Pycom. Plus, there were several months of outstanding Pull Requests, so it wouldn't have been swift to get any proposed changes included into the extension.
For these reasons, Pico-Go was created using the Pymakr code as a starting point.
At the time of writing, the main changes from the original Pymakr project are:
- Communication is via serial port only since there is no Wifi capability on the Pico;
- File hash checks have been removed;
- A new command has been added to the Command Palette allowing a user to delete all files and directories from their Pico board;
- Documentation has been comprehensively updated, corrected and pruned.