(This was pulled from the document on dataset creation by the Pony Preservation Project) Original documents are here: https://u.smutty.horse/mhmqxnbjaye.docx https://u.smutty.horse/mhmqxnefvuj.pdf
This is a guide on how to create a dataset of raw voice clips and text transcripts for any given source of audio. The output of this process can then be used to create a dataset for training in Google Colab and/or submitted to 15 ([email protected]) for potential use at https://fifteen.ai/
Note that our system uses a file naming system different to that specified for contributions on 15.ai, however 15 is able to use the pony dataset without issue so it should be fine to submit your datasets to him using the same format we do. Just make sure you follow the format closely and note in your submission that you used the same system as us. Alternatively, you could adapt the PPP method to use a different naming system if you prefer. Please also share any datasets you create in the thread, more data is always helpful.
Before you start any work, please post in the current PPP thread about what you plan to do so other Anons know what's being worked on.
See also the section on cleaning audio if your audio source contains undesirable elements such as sound effects that obstruct the voice.
To submit your contributions, please follow the guidelines for submitting your content when you are done.
See also the "Automatic Clipping and Transcribing" section for an alternate method.
If you have any questions about the process, ask Clipper in the thread.
The full process is demonstrated by Clipper in this YouTube video.
The goal of this process is to take the full cut of an audio source and slice it into its individual lines, which will all be tagged with data such as the character speaking, the emotion with which the line is spoken and a full transcript of all the words spoken in each line.
Here is an overview of the core steps of the dataset creation process:
- Obtain audio for your chosen character
- Obtain subtitle .srt file and transcript, if possible.
- Download Audacity, Notepad++, and Python.
- Use the subtitle to Audacity app, if you were able to get a subtitle file.
- Run the character tagger program, if you were able to get a compatible transcript.
- Import the audio files into Audacity, and then create and edit labels as needed.
- Export labels from Audacity and run them through the checking script, correcting any errors it finds.
- Re-import the corrected labels into Audacity and export the audio clips.
- Create a text transcript of all the newly created audio clips.
- Upload all the files you've created.
We will now explain the process of each of these steps in more detail.
There are several potential sources of audio, and some sources will be better than others. Here are some suggested sources, in order of most ideal to least ideal:
- Raw studio recordings
- PC game files
- Audiobooks and podcasts
- Netflix and iTunes videos
- YouTube videos
Raw studio recordings are often the hardest to obtain but will offer perfectly clean studio quality voices which are the best source of any audio. We were lucky enough to get some studio recordings for various MLP episodes from BigHckintosh as part of the Hasbro studio leaks.
The sound files in PC game files are often similar in quality to raw studio recordings and are easier to obtain. If you're training for a character or voice actor that appears in a video game, go digging through the files and see what you can find. You can also consult forums dedicated to the particular game if finding the specific files proves difficult.
Audiobooks and podcasts are also usually recorded in proper sound studios, but will also tend to have undesirable elements such as music and sound effects mixed in. These are often easily accessible on their respective host websites, and you can even download podcasts directly from iTunes.
Shows hosted on Netflix and iTunes are usually in high quality, but will almost certainly contain sound effects and background music which will obstruct the voices. This can be mitigated to an extent, but it's never going to be as good as the raw recordings. For iTunes, you can simply download videos directly. To download videos from Netflix, you will need to use Flixgrab. For both Netflix and iTunes, make sure that the video you download has 5.1 audio, a format which should allow you to isolate and remove background music. You can usually find audio information like this in the detailed video descriptions. Note that obtaining 5.1 rips of audio in multiple languages will also be useful for removing background noise.
A YouTube video can be used if there is no material available on Netflix or iTunes, but is a much less ideal source as compression will compromise audio quality. The audio will also only be available in stereo, which means you won't be able to remove any music. Only use YouTube if there is literally no other viable option. Search for "youtube downloader" in Google for various online solutions to directly download videos from YouTube.
As a general rule, you should aim to obtain at least thirty minutes of audio for your chosen character before attempting training. This is the minimum amount of data you need to guarantee a reasonable chance of getting a decent output from your model. As with all applications of artificial intelligence, more good quality data will result in a more accurate model, so you should always aim to gather as much data for your chosen character as you can.
Subtitles contain information on the content of speech and the time it occurs, which we can use to create Audacity labels to give us a head start. It may be possible to rip these files from a Blu-Ray disk, or they may be found online here. You can also use this programme to download subtitles from YouTube videos, make sure you download in .srt format.
We have also created a tool to automatically tag characters to their lines with the help of a transcript. For this tool to work, you will need a transcript in the same format as shown here. You may be able to find a transcript like this for your show at https://www.fandom.com/. Even if you can't find a transcript in this exact format, it can still be used as a source to copy-paste from to help with transcribing lines later on.
If you can't find .srt files and/or a transcript for your audio, don't worry too much. This step is optional, though having these files will make your life much easier later on so it is strongly recommended to make every reasonable effort to find them.
Audacity is a free open-source audio editor, we will use it to do the work of slicing the audio into its individual lines. Download Audacity here.
Notepad++ is an enhanced version of notepad for editing text files. We will demonstrate some of its useful features later. Download Notepad++ here.
Python will allow us to run scripts to automate some steps for editing Audacity labels later. Don't worry if you don't have any expertise in coding, we won't be doing anything complicated and all the steps are fully demonstrated in the video. Download Python here.
Simply download and install these in the same way you would for any other programme.
If you are using a Netflix/iTunes/YouTube video as your audio source, you will need to isolate the audio from the video. The easiest way to do this is to install the FFMPeg plugin for Audacity, which will allow you to import video files just like you would for an audio file. Instructions for the Audacity plugin can be found here.
If you weren't able to get a subtitle .srt file, you can skip this step and also the Character Tagger step. Click here to skip this section.
Open the .srt to Audacity app here.

This is the subtitle to Audacity converter. It will generate Audacity labels with the information in the subtitle file, which will give us a head start. To use it, simply open the subtitle file in the app, then click merge overlapping labels. This will merge any subtitles with overlapping timestamps into a single label. I recommend you leave the other two options blank. We will automatically generate timestamps later, and the safe filename option will remove question marks, which you will have to retype later.
The drop-down option will allow you to choose a formatting option for the output. You can use whichever formatting you want. Run the app, and save the output in a useful place.
If you were able to find a suitable transcript for your audio for use with the character tagger, go to the next section now. If not, keep reading.
Open the output of the subtitle to Audacity app in Notepad++ and use a macro to add three underscores to the start of every label. The use of macros in Notepad++ is demonstrated in the video here. Once done, follow this demonstration in the video to make some minor edits to the labels before importing them into Audacity.
If you weren't able to get a transcript in the format shown earlier, you can skip this step. Click here to skip this section.

This is the Character Tagger. It will attempt to match every spoken line to a character by comparing the lines to a transcript. Open the output from the subtitle to audacity app from the previous step in the middle box, and then copy and paste the transcript in the left box. In the suffix box, type in three underscores, and then click label unknown characters. Exactly why we do this will become clear in the next step. Run the programme and save the output in a useful place.
Open the output of the Character Tagger in Notepad++ and follow this demonstration in the video to make some minor edits to the labels before importing them into Audacity.
This process is demonstrated in full in the video. I suggest you use the video as your primary source of information here as I feel that a live demo explains the process better than can be done with simple text and screenshots.
Open the dialogue audio file in Audacity. Once the audio has finished loading select "File" ->" Import" -> "Labels" in the menu. Choose the label file that we just created in the previous step. If you skipped the subtitle to Audacity step, you won't have any labels to import and will instead need to create them manually. Create a label track by selecting "Tracks" -> "Add new" -> "Label Track". See this section of the demo video for a guide on creating labels manually.

The idea here is to draw labels around all the individual lines of dialogue, and then fill those labels with the information we need. The start and end points of each label will mark the start and end point of each clip. The black vertical bars in the label track represent label boundaries, beginning and end. Clicking and dragging on either will allow you to start a selection from that point. The circular buttons on either end of the label text allow you to move the entire label in time, and the triangles attached to the circles allow you to move the beginning or end individually. You can create new labels if needed by highlighting a section of audio and pressing "Ctrl+B".
Use this to create and adjust labels as needed. You may combine labels as needed if the audio doesn't split well on the existing bounds between two labels, though there's no automatic way of doing this. Simply right click on and delete the second label and extend the first one to compensate.
Audio clips should contain about a sentence worth of dialogue, but it is most important that your clips are split in a way that sounds natural. Do not let clips start part way into a word or let them end in the middle of one. Try to clip such that the emotion conveyed by the tone of voice is consistent throughout. Audio clips should also contain entirely noisy or entirely clean audio, so take this into account as well when deciding where to put your clip boundaries. When filling in the labels, you must make sure to include all the necessary information in the format shown below:

Timestamp - Ignore the timestamp while filling in the labels in Audacity, we will automatically generate it later.
Character - You can use abbreviations for tagging characters while clipping your audio to save time, for example "twi" for "Twilight". You can use whatever abbreviations you want, just make sure you keep a note of what you have used for future reference, you will need to enter the abbreviations you've used into the checking script in the next section.
Emotion - The suggested list to use is: Neutral (n), Happy (h), Amused (am), Sad (s), Annoyed (a), Angry (ag), Disgust (d), Sarcastic (sa), Smug (sm), Fear (f), Anxious (ax), Confused (c), Surprised (su), Tired (t), Whispering (w), Shouting (sh), Whining (wh) and Crazy (cr). It is suggested to use the one or two letter abbreviations given in the brackets for quicker and easier tagging, these abbreviations will be expanded into their full versions with the use of the checking script in the next section. If appropriate, you can use multiple emotion tags in a clip, such as "Happy Shouting" or "Angry Whispering". In these cases, make sure that the tags are separated by a space. You can also invent and use other emotion tags if you feel that none of the emotions listed above fit your audio. If you do this, make sure to keep a note of what you have used for future reference, you will also need to enter the abbreviations you've used into the checking script in the next section.
Noise - This is a difficult concept to explain as it's always going to come down to a judgement call. It is important to get this right, so make sure you put on a decent pair of headphones and listen carefully. If a clip is clean, that is free from all but the most trivial of noise, then leave the noise tag blank. Make sure that the underscores are still included. If there is significant noise in a clip, then you will need to make a judgement call. Marking it as noisy is effectively you saying that you would be happy to use that clip for training, despite the small amount of noise it still has. Marking the clip as very noisy is effectively you saying that the clip is unsuitable for training due to excessive noise. Generally speaking, for a clip to qualify as noisy, you should be able to clearly make out all syllables of every spoken word, and the noise itself should be quieter than the speech. It's usually best to be strict for the sake of preserving quality, so If you find yourself in doubt between clean and noisy, tag it as noisy. Similarly, if you find yourself in doubt between noisy and very noisy, tag it as very noisy. Use the shorthand "q" for noisy and "qq" for very noisy.
Dialogue - The transcript must contain every word that is spoken in each clip, exactly as spoken, with correct spelling and punctuation. Remember that all pauses should be represented by a comma or full stop, whichever fits best. All sentences should end with either a full stop, a question mark, or an exclamation mark. A sentence should not end with a comma. Also be careful not to make the clip too long, as everything you enter into the label will later become the filename for that clip. Windows imposes a hard cap of 260 characters for a filename, including the directory. As a general rule, each label should contain about one sentence of speech. The length should be at least one second, and no more than ten seconds. You can combine and split labels however you feel is best.
Keep in mind to not make the label of the clips too long, as what you enter into the label will later become the filename of that clip. Unfortunately Windows, being a shit OS, has a hard file name limit of 260 characters. Note that the character limit includes the file directory, so if you find that a filename has become too long to edit, try moving it out of folders/subfolders and into just the "Documents" section in the file explorer. This will shorten the directory path and allow you to edit filenames that would otherwise exceed the character limit.
Example:
C:\Users\Anon\Documents\PVPP\Sliced Dialogue\FiM\S1\s1e1\00_00_05_Celestia_Neutral__Once upon a time, in the magical land of Equestria..flac (135 characters)
C:\Users\Anon\Documents\00_00_05_Celestia_Neutral__Once upon a time, in the magical land of Equestria..flac (102 characters)
After editing the filename, you can then move it back into the original folder/subfolder, even if it exceeds the character limit.
I'll recommend again that you watch the section in the demo video that covers this section, as a live demo will communicate the process better.
We have now made the labels in Audacity with the character, emotion and noise tags and transcript. The next step is to make sure that there are no mistakes and add the timestamp to the start of each label. Refer back to the file naming system for details on the format of the timestamp.
Before following any of the instructions below, make sure you have exported the Audacity labels. File -> Export -> Export labels. Name the file "labelsraw.txt".
The checking script is available here. It will do the following:
- Replace shorthand character, emotion and noise tags with their full versions.
- Add a timestamp to the start of each label in the correct format.
- Check for some common abbreviations in the dialogue that should be expanded into their full versions, such as Mr. for mister.
- Check for any numbers in the dialogue that should be replaced with the word version.
- Adds a full stop to the end of any label that does not end with any sort of punctuation.
I will write out the full process for using the script, but I highly recommend watching the demonstration in the video. I feel it does a much better job of explaining than can be done with just text and screenshots.
To use the script, copy and paste it into a new Notepad++ file, and save it with a .py extension. This will save it as a Python executable. You can name the script whatever you want, the extension is the only thing that matters here. Create a new folder for the script and save it there, making sure there is nothing else in that folder.
From lines 158 to 398, you can see the stored information for shorthand character codes. You can add, remove and change any entries as needed, just make sure it's all in the same format as seen in the script, this is demonstrated in the video. The script will check for any abbreviations in the character field, and replace any it finds with its corresponding full version. It can also check for longer character tags and replace them with a shortened version.
From lines 400 to 423, you will see the entries for emotion. From lines 425 and 428, you will see the entries for noise. From lines 430 to 433, you will see the entries for abbreviations. These all work in the exact same way as for the characters, and you can also add to and edit these however you like, just make sure the formatting is kept consistent.
We now need to do just one more thing before we're ready to run the script. We need to tell the system to run the script in the console window so we can see its output as it goes through the labels. Create a new file in notepad++, and type the following:
@echo off
python filename.py
pause
Replace "filename" with whatever you named the checking script. Save this file as "Run.bat" in the same folder as the checking script. This process is also demonstrated in the video.
We are now ready to run the checking script. Copy the Audacity label file into the folder containing the checking script, and name it "labelsraw.txt". Double click run.
You will see in the output "labels.txt" folder that the script has added all the timestamps to the start of each label, and expanded all shorthand tags to their full versions. The demo video contains examples of how the checking script alerts you to any errors.
Once you have fixed all the errors the script has found, run it again on the corrected labelsraw.txt file to make sure nothing was missed. Once done, you can discard the labelsraw.txt file. We now need to do one last check on the output label file. Use find and replace to correct any cases of double spacing, and make sure there are no spaces before or after any of the underscores. Then copy and paste the labels into a word processor, such as Microsoft Word or a Google document and run a spell-check. Fix any spelling errors it finds and copy the corrected labels back into the Notepad++ file. Save the file containing the completed labels.
Import the new labels into your Audacity project and delete the old ones. We are now ready to export the audio to make the individual clips. It is recommended to disable "Show Metadata Tags editor before export" in the "Edit" -> "Preferences" -> "Import/Export" menu to prevent a window popping up for every single label in your project.


Now go to "Export -> Export Multiple". Make sure the settings match what you see in the screenshot below, and then select the folder you want to export the clips to. Once done, click export.
Q  uestion marks are not allowed in filenames, so Audacity will automatically ask you if you want to change them to an underscore. Press the enter key to confirm the change, along with every other label this applies to. Do not spam or hold down the enter key, as this occasionally creates duplicate files.
You may run into an error while exporting that interrupts the process. The most common cause of this is that the filename is too long, remember the 260 character limit for a filename, including the directory. If this happens, simply go to the label that caused the problem, and split it into two shorter ones. If you make any edits to the labels like this, make sure you re-export the updated label file.
The output should look something like this, with all the clips created with a filename according to the label we created in Audacity.

We now need to create a text file transcription for all of these audio clips. We need a text file for every single audio file that contains all the words spoken in each clip, and also has the exact same filename as the sound clip it is associated with. You can imagine that doing this manually for several hundred or even thousand clips would be a very long and tedious task, so we have created a script that will do this automatically. The use of this script is very similar to what we did with the checking script earlier and is demonstrated in the video.
The script is available here. This script will read the dialogue section of Audacity labels and create a text transcript containing that dialogue. This is why it's important that the dialogue section of every Audacity label is accurate to the spoken dialogue, as any errors in the labels will be replicated in the generated transcript. The script will then save the transcript as a text file with the exact same name as the sound clip it's associated with.
To use the script, copy and paste it into a new Notepad++ file. Just like we did with the checking script, save this new file with a .py extension to save it as a Python executable. You can name the script whatever you want, just make sure you remember the .py extension. Save the script in its own folder, making sure there is nothing else in the folder. Now create a "Run.bat" file in the same way we did with the checking script, and save it in the same folder.
Copy and paste the text file containing the Audacity labels into the folder with the script, and make sure it is named "labels.txt". Double click run.
The script will have created a text file transcription of every sound clip and saved it with the exact same name as the clip it's associated with.

Now cut and paste the text file transcripts into the same folder that contains the sound clips. The final result should look something like this:

The hard work is now done, all that's left is to submit your content. As shown earlier, there are several file host options available. It doesn't really matter where you upload your clips, so long as they are easily accessible.
Compress all the sound clips, text transcripts and the text file containing the Audacity labels into a zip file, upload to your file host of choice and then post a download link in the current PPP thread. Some recommended file hosts are Smutty.horse, Mega.nz, and catbox.moe.
Please do share any datasets you create with us over on /mlp/, we're always looking for more data to work with to improve our models and processes, especially with characters that have unique speech quirks and a wide range of emotions. You can also try emailing the download link to 15 ([email protected]) for use on 15.ai, but he works separately to the PPP so unfortunately no guarantees can be made.
And that's it, we're done! This is all we need to do to create a basic dataset of sound clips and transcripts for any given source of audio. If you have any questions or points of clarification on any of the instructions written here or shown in the video, feel free to post them in the current PPP thread. In the thread, you will find me under the name Clipper. You can also email me at [email protected]. I always do my best to respond to all questions about creating datasets.
(Credit to: >>35315142 for creating the notebook)
This section is intended to assist with using the Automatic Super Speaker-Filtered Audio Processing (ASSFAP ™ ) Colab notebook. The notebook allows you to use IBM's Cloud Speech tools to automatically clip and transcribe lines. While automated clipping may not be as accurate as manual clipping, it is a heck of a lot faster. These instructions will largely mirror what is in the notebook itself.
Open the notebook itself here:
The first thing you'll need to do is open the notebook in the playground. Click the button in the upper left to do so.

On the first code block you run, you will be prompted by Google whether or not you wish to run the notebook. Select "run anyway".
Before you upload your files to be clipped, you will first need to prepare them. You'll want to create a folder called "files" and put the audio files you want clipped inside. Make sure that none of the files are over 100mb else IBM's Cloud Speech tools will error out and the file will be skipped. I recommend using Audacity to cut your files into smaller pieces if needed. Make sure to cut where there is no speech.
Next you will need to create a small sample file of the speaker you wish to clip. It should be between 2 and 6 seconds long. Again, I recommend Audacity for this. Name the file "sample.wav" and place it outside of the file directory. When done it should appear as follows:

Add the files to a .zip file without any other subdirectories. When you open the zip, you should be able to see the files folder and the sample file.
Next, upload your .zip file to your Google Drive. Once done, you will need to publically share it and get the Drive ID. You will want to store this for later. For example:

Another thing you will need to set up is an IBM Cloud account. Do it here. Once you have set up your account, you will need to get an API key and URL for the Speech to Text tool. Be aware that the free plan only allows a limited amount of transcriptions per month.
From the dashboard click on "Create Resource" in the upper right hand part of the screen.

Click on "Services".

Click on "Speech to Text".

You will be given some options, but you can leave them as is. Click on "Create" in the lower right hand corner.

With that created you can go back to the dashboard (click the IBM logo at the top). Under resource summary, you should see "services" listed. Click on it.

You'll then see something similar to below. Click on "Speech to Text-cy".

You will then have access to your API key and URL. Note these down for later.

On to the notebook itself now. At the top of the first box you will need to set the sample rate and root path you want to use. If you want to use 22KHz data, leave sarate alone. If you want to do 48KHz, set it to 48000. Change the root path to where in your drive you want the output files saved.

Once done, run the first cell. Note that you will need to authorize the notebook to access the contents of your drive when you run the cell (paste the authentication code into the box).
In the second cell, take your .zip file's Drive ID and paste it where "YOURIDHERE" is.

In cell three you will need to enter your IBM API key and URL.

In cell four, you can change the output filename. You can set it to anything you want, all it changes is the filenames of the .tar.gz files the notebook produces.

At the top of cell five, you can adjust the audio volume for all clips if overall they are too loud.

The next section (cell 6) can be ran as is if you want to produce a 22KHz dataset. For 44KHz, you will need to modify it with the ARPA function from the 48KHz Synthesis notebook. Replace the existing ARPA function with:
!git clone https://github.com/jeroenmeulenaar/python3-mega.git
!(cd python3-mega; pip install urlobject pycrypto)
import os
os.chdir('python3-mega')
from mega import Mega
os.chdir('../')
m = Mega.from_ephemeral()
print("Downloading Dictionary...")
m.download_from_url('https://mega.nz/#!yAMyFYCI!o\_UmixbiIzosyYk-6O5xRZZDGpFRik\_eMrZum-iQuhQ')
def ARPA(text):
out = ''
for word_ in text.split(" "):
word=word_; end_chars = ''
while any(elem in word for elem in r"!?,.;") and len(word) > 1:
if word[-1] == '!': end_chars = '!' + end_chars; word = word[:-1]
if word[-1] == '?': end_chars = '?' + end_chars; word = word[:-1]
if word[-1] == ',': end_chars = ',' + end_chars; word = word[:-1]
if word[-1] == '.': end_chars = '.' + end_chars; word = word[:-1]
if word[-1] == ';': end_chars = ';' + end_chars; word = word[:-1]
else: break
try: word_arpa = thisdict[word.upper()]
except: word_arpa = ''
if len(word_arpa)!=0: word = "{" + str(word_arpa) + "}"
out = (out + " " + word + end_chars).strip()
if out[-1] != "": out = out + ""
return out
thisdict = {} # And load it
for line in reversed((open('merged.dict_1.1.txt', "r").read()).splitlines()):
thisdict[(line.split(" ",1))[0]] = (line.split(" ",1))[1].strip()
When done, it should look like this:

The next block of code is where the actual clipping and transcription take place. At the top you will see some parameters to be tuned. The functions of the parameters are as marked.

Once clipping has begun, you should see something similar to below:

After all has been clipped and transcribed, you are ready to package the data. Note that if using a 48KHz dataset, change the indicated text to 48000.

When the last of the cells are run, you will find two .tar.gz files in your Google Drive at the path you set.

The _json .tar.gz contains metadata for if you want to reuse the same transcriptions later. The main file you will be interested in is the regular .tar.gz file.
Note that this is NOT in the same format as the standard pony datasets. To use with the training script you have two options. You can treat the extracted files as a standard custom dataset or you can replace the data import cell with the following:
import shutil, os
data_path = '/wavs'
!rm -rf wavs
print("down flv")
!gdown --id YOURIDHERE -O dat.tar.gz
!tar -xzf dat.tar.gz
print("move")
shutil.move("data/filelist.txt","filelists/flist.txt")
shutil.move("data/valist.txt","filelists/vallist.txt")
shutil.move("data/wavs","wavs")
hparams.training_files = "filelists/flist.txt"
hparams.validation_files = "filelists/vallist.txt"
Just create a new cell in section 3 of the notebook, paste the code in and run it when you are ready to import your data. Make sure to replace YOURIDHERE with the Drive ID of your exported dataset.
Audacity has a noise reduction tool that is primarily designed to remove background "hiss" that is commonly found with low-quality microphones. This tool can be adapted for use on any background noise that is constant and consistent, such as fan noise.
We will demonstrate the noise reduction process on this clip from the "Dead Air" Dr. Who Audiobook. Put on your headphones and listen carefully, you should be able to hear a "hiss" in the background.
Here is a video demonstration of the process. To use the noise reduction tool, you will first need to find an isolated sample of the noise you want to remove. The minimum sample size required is about half a second, but always try to find the largest sample you can. Here is the sample of the "hiss" that we will use. Once you have found a suitable sample, use the select tool to click and drag from the start to end of the sample, this will highlight the selection. Once done, go to "Effect" -> "Noise Reduction". In the window that pops up, click "Get Noise Profile". This is effectively you giving Audacity an example of what you want to be removed.
Now highlight the section of audio you want to remove the noise from, and again go to "Effect" -> "Noise Reduction". The default settings should work fine, so just click "Ok". Listen back to the sample to verify that the noise has been removed. If there's still some left, you can repeat the noise reduction process. Note that running the noise reductions several times will degrade the quality of the audio, so at some point you may need to make a compromise.
Here is the noisy clip that's been processed by the method described above. You should be able to hear that the "hiss" is almost completely removed.
For any noise or undesirable sound effects that are completely isolated, there is a much simpler solution. Just highlight the noise you want to remove, and then go to "Generate" -> "Silence" and press "Ok". This will replace the isolated noise with silence.
The process we've come up with to clean the audio in the least destructive way takes advantage of the identical background noises present in forign dubs of the show. The short of it is that we align two dubs and use a center channel extraction tool to remove the similarities between the two tracks. Below are two quick demos of the process, do note that these are slightly out of date and is best to use this document as the definitive guide for this process.
Quick Video: YouTube
Narrated Tutorial: YouTube
To begin, you will need to locate two dubs of the show that are as close to each other as possible. The best source we've found for this is Netflix rips of the show. Do note that 5.1 rips are necessary for both the English and forign dub that is used. Due to this, the later seasons of the show will not be able to be processed in this manner as only stereo forign dubs exist at this time. See Resources.
Once you have procured the audio files you will be working with, both will need to be processed according to either this guide or using the mlp_dialog_rip.sh script from tools (It uses the same process). While the 20db reduction mentioned in the guide is correct for English dubs, it may not be correct for all forign dubs. One Anon suggests 14db is more often correct in these instances. In all cases, use your ears to determine the proper value of this reduction.
With that done you should be left with two mono audio tracks, one in English and the other forign.

Your task here is to ensure that the two dubs are perfectly lined up. This is extremely important, so much so that the alignment needs to be sample perfect. That is to say that they must line up even when you zoom all the way into each individual sample (Use ctrl+alt+scroll to zoom in and out).
The best way to go about this is to find a location in the audio where both have a distinctive peak that can be used as a landmark. Take this hoofstep as an example, it may not be a large peak, but it is alone and isolated in each track.

Use the time-shift tool to adjust the forign dub to match up with the English. It is important that the English track stays in place so as to maintain alignment with the rest of the project.
Once you've got it close you will want to zoom in even closer. However you may notice that the graph flattens out and makes it hard to do alignment. The solution to this is to use the vertical zoom feature of Audacity. If you click on the time scale to the left of the graphs (Notice the red box), it will zoom in vertically. Use right click to zoom back out.

As you can see it is now much easier to align the tracks. You will want to continue to align the tracks as you zoom in until you have the tracks aligned to the sample. Aligned tracks should look like the following at this scale.

After you have aligned one spot, it is important to check alignment at other parts in the episode. It is not uncommon for the tracks to go out of alignment where commercial breaks would be. If this does occur, split the forign dub by selecting a point with the selection tool and pressing ctrl+I. Make sure that you are not splitting the track when any dialog is taking place. Once you've done this you will be able to adjust the two pieces of the track separately.

Once you are confident that the two tracks are aligned you will need to balance the tracks. This means ensuring that both tracks are at exactly the same volume. To do this it is recommended to find a section of the audio with a distinct sound effect, free of dialog (such as a hoofstep). You will want to make a selection of that noise on the English track and click on Effect->Amplify.

Enter 0 for the amplification and take note of the new peak amplitude. You will want to copy this into your clipboard and close the window.

You will then want to make the same audio selection on the other track and click on Effect->Amplify again. Paste the new peak audio from before into the new peak audio here.

Take note of the amplification value that this gives. Copy this into your clipboard. Now select the entire forign dub (You can click anywhere that is empty in the box to the left of the track to select that track) and use Effect->Amplify to amplify the entire track by this value.

At this point you can check how well aligned and balanced the tracks are. If you invert one of the tracks, all background sound effects should be gone (You will hear both sets of dialog when you do this).

Ensure that neither track is inverted for the following steps. You will want to select both tracks (ctrl+A), click the dropdown menu to the left, and select "Make Stereo Track".

The two tracks should now appear as a single stereo track, with the English dub panned entirely to one side and the forgin dub entirely to the other.

Now you will want to export your track to a lossless format (such as FLAC) using File->Export->Export Audio....


For the next step we will need iZotope RX7 (See Resources). Open your exported track.

You will want to use the "Center Extract" tool on the right. Select "Keep Sides" and "True Phase". Set reduction strength to 1.5, and artifact smoothing and dry mix to zero. These are the settings we've had the best luck with.

Once done configuring the settings, select render. This may take a few minutes for a whole episode.
Once done, export your track in a lossless format (FLAC) and import into a clean Audacity window.


Click on the dropdown menu to the left of the track and select "Split Stereo to Mono".

It should now look something like this.

Click on the x to the left to remove the forign track. You should be left with just the cleaned English dub.

At this point you are essentially done. Give it a listen at a few points to ensure the process worked successfully. Export as FLAC, upload to your favorite file host, and submit in thread.
RTX voice is nVidia's fancy new AI microphone audio cleaner. However, it doesn't just have to be for live audio. You can use it for prerecorded stuff as well.
Requirements: An nVidia GPU.
If you have an RTX card, you can just run the installer from nVidia.
If you have a GTX card, you can follow this guide to get RTX voice up and running.
Once you've got it installed, you can capture the output audio via Audacity. Make sure you have the API set to WASAPI (it's the only one I found to work) and the microphone set to the loopback of your default audio output device. Once done, you're basically good to go.
If you do not want RTX voice to run at startup, you can disable it via the task scheduler. Note that the RTX voice application does not show up in the task manager startup list. You can see an example of the task scheduler entry below. Right click and disable the task to stop it starting at login.

Some samples:
As you can hear, the RTX voice cleaning works best with constant sounds.
*I performed the following in Debian. As per the GitHub, Windows support has not been tested. I used a virtual machine.
Open Unmix is open source software that makes use of neural networks for music separation. We have used it to help us further clean audio of background noises.
To use Open Unmix, you will need to have Python installed as well as the dependencies for Open Unmix. You can install them with the following command.
pip3 install torch musdb norbert librosa
Clone the Github repository with:
git clone https://github.com/sigsep/open-unmix-pytorch.git
The full list of options for Open Unmix can be found at THIS page. The ones we will be interested in are --model and --targets. We will set --models to use the default models and --targets to only run the vocals model. Inside the open-unmix-pytorch folder you can run the following command to process audio. Replace track.wav with the path to your sound file.
python3 test.py track.wav --model umxhq --targets vocals
When complete, the processed files will be placed into the track_unmxhq subfolder. There will be a vocals.wav and accompaniment.wav. Vocals will be the extracted voice data and accompaniment will be everything left over.
Video demo - https://u.smutty.horse/lwcswhmdfbf.mp4
These steps explain how to get an ngrok link to Cookie's Multispeaker Colab Notebook. This lets anyone use a Colab server to create audio clips voiced by any of a few hundred characters.
You don't need a fast connection or powerful computer to do this. This uses Google's resources to host a server. Ngrok lets you expose Google's server to the public internet so anyone can access it.
- Open Cookie's scripts in Colab.
- https://colab.research.google.com/drive/1UjSg4tDcubbkax781fE0pNeAFdht_MZ0?usp=sharing
- Click the "Copy to Drive" button. This button is tiny and gray, so it's hard to see. Ctrl+F for the text.
- Follow the instructions in step "1 - Mount Google Drive and add model shortcut"
- You may need to click the folder icon on the left. You'll see an option for "Mount Drive" once you do.
- Run all of the cells one at a time in sequence until you reach step 3. Once you run the cell that ends with "!python3 app.py", you'll get a link to the server. It will take about a minute before the link is active.
- In the same window, open the Dev Tools Console
- In Chrome, the hotkey to open Dev Tools is Ctrl + Shift + J
- In the window pane that opens up, select the "Console" tab
- Copy/paste the following and hit Enter. This will get the Colab instance to stay running for longer.
function ClickConnect(){
document.querySelector("paper-button#ok").click()
}
setInterval(ClickConnect,60000)
- Post the link in the thread so other anons can use it.
For a more detailed guide, see the Inference Server guide.
Thanks to Cookie and Synthbot, anybody can now begin training a TacoTron2 model. This guide will take largely from their instructions and posts in thread. All that will be needed is a Google account in order to use Colab.
[disclaimer]The AI side of things is still being worked on. Always be sure to check the threads for the most up to date information on the process and resources.[/disclaimer]
Before anything, a copy of the dataset must be present in your Google drive. Copy Synthbot's "Soundtools" into your drive.
https://drive.google.com/drive/folders/1SWIeZWjIYXvtktnHuztV916dTtNylrpD

Option 1: Using Synthbot's tools
Don't do this unless you're a developer.
Video Demo: YouTube
This will allow you to create tar files just like the ones available from the soundtools folder. Just upload your tar files into your soundtools folder, and point the training notebook towards it.
Find the directions on using Synthbot's tools on his Github here.
If you don't have a linux machine, you can use Virtualbox. Just set up a linux install and follow the instructions on Github.
Option 2: Using audio and text files
You will need to have your audio files in .wav format (48KHz 16bit mono) and a properly formatted filelist.
The filelist should contain a list of all file paths and the accompanying transcription. For example:
/wavs/out/filename1.wav|Transcription text 1
/wavs/out/filename2.wav|Transcription text 2
/wavs/out/filename3.wav|Transcription text 3
And so on.
Once you've run through the first part of the notebook up through the block that creates /tacotron2/wavs/out/, you will need to upload your .wav files here.

You will then need to upload your filelist into /tacotron2/filelists/.

Refer to the appropriate training tutorial for further instruction.
*General disclaimer, am not a Linux guru. These are just the steps that I took.
YouTube demonstration: YouTube
The steps here are intended to help you setup and run Jupyter notebook with the Google Colab notebooks. In order to run these, you will need a new-ish nVidia GPU, a CPU with AVX and SSE4.x, ~30Gb of RAM and/or swap, and a Linux install. In this tutorial, I will be using Debian.
You will first need to download the contents of Synthbot's soundtools folder somewhere onto your computer, or at least the files you intend to work with.
You will need to install the official nVidia drivers. By default, Debian comes with Nouveau drivers. To enable you to install them, you must add the contributor and non-free repos to your sources.list file. In this tutorial I will be using Nano as my text editor, feel free to use whatever you'd like. Run the following command as root.
nano /etc/apt/sources.list
At the end of each entry, add "contrib non-free".

Save with Ctrl+O and exit with Ctrl+X. Then run:
apt-get update
You can now install the nVidia utility to determine which driver you should install (typically nvidia-driver).
apt-get install nvidia-detect
The output should look similar to this:

Then install the recommended driver with apt-get. For "nvidia-driver":
apt-get install nvidia-driver
Running the install will likely bring up some warnings. Reboot your computer when done.
You can verify that you are running the official drivers with the lshw tool. Install and run it with the following:
apt-get install lshw
lshw -C display
If you have successfully installed the driver, it should look like this. The relevant bit of information is boxed in red. Should say "nvidia" for the driver.

Python3 should come preinstalled on Debian. You can check what version you have with the following.
python3 --version
Now you can install all the things needed to run the notebooks. This list was accurate for the previous version of the 48KHz MMI training script. If things don't work, check the error messages in Jupyter. Install the items that the messages complain about.
apt-get install python3-pip nvidia-smi git python-pip curl nvidia-cuda-toolkit
pip3 install jupyter matplotlib librosa tqdm torch unidecode inflect tensorboardX tensorflow
This next step is optional. If you would like to access your Jupyter instance from another computer you can do the following.
jupyter notebook --generate-config
nano /YourAccountHere/.jupyter/jupyter_notebook_config.py
The output of the Jupyter notebook --generate-config option should tell you the file path for the configuration file you want to edit. The edit the following lines:
Change: "#c.NotebookApp.allow_origin = ''" to "c.NotebookApp.allow_origin = '*'"
Change "#c.NotebookApp.ip = 'localhost'" to "c.NotebookApp.ip = '0.0.0.0'"
To get your IP address for access on another computer, run:
hostname -I
Now run the Jupyter notebook. If you want to run it as root, can do so with the --allow-root option.
jupyter notebook
Follow the link it provides you to get access to the web client. You can set a password for easier access in the future.
Now you can open your Colab notebook in jupyter (in .ipnb format). It will probably give a validation error whenever it saves. To get rid of (or at least postpone) this annoyance you can change the autosave frequency to something less frequent. Make a new cell at the top of the notebook and put:
%autosave 18400
You can change 18400 to whatever you'd like. This is a time in seconds, 18400 is approximately a day. Just remember to manually save your notebook when you make changes.
Now you will need to make some changes to your notebook. Redirect all file paths to local ones. You can also get rid of the Google Drive mount as you will be running things locally.
There is a bit of an issue when running importing matplotlib and torch. If you have an error where torch will not recognize your installed nVidia drivers, move the import of matplotlib before the import of torch. This will fix the issue (source: some internet forum yet to be linked). An example of doing this is shown below.

Another bit of troubleshooting that may be necessary, if you find yourself with an "RuntimeError: cuda runtime error (999) : unknown error" it's an issue with the nVidia driver. Fix it with:
sudo rmmod nvidia_uvm
sudo rmmod nvidia
sudo modprobe nvidia
sudo modprobe nvidia_uvm
Source: Stack Overflow
From there you can basically use it just as you would on Google Colab. An example of a modified notebook is linked below. This is an older version of the 48KHz MMI notebook with the soundtools folder located in /home/YourAccount. Change "YourAccountHere" to the name of your account if you intend to use it. You will also likely need to lower the batch size in order to fit into your VRAM (I use 12 for 4Gb and 16 for 6Gb, can mess around to see what'll work). Link.
One recommendation I have if you are using the 48KHz MMI training notebook, keep an eye on your RAM/swap usage with some kind of resource monitor. If you encounter the memory leak, restart the kernel just as you would in Colab. I use htop. Install and run with:
apt-get install htop
htop
This section of the doc is intended to give guidance on usage of Cookie's 48KHz MMI training notebook. To begin, open the notebook here.
The first thing you'll need to do is open the notebook in the playground. Click the button in the upper left to do so.
On the first code block you run, you will be prompted by Google whether or not you wish to run the notebook. Select "run anyway".

The first code block that you will run will check to see what GPU Google has assigned you. Ideally what you'll want is a P100, however you may be assigned a lesser GPU depending on what Google has available and how much you have used the service recently. Once you've run the block it should look something like what is shown below. The GPU you have been assigned has been boxed in red in the picture.

If you have received a lesser GPU and would like to try for a better one, factory reset your runtime and run the block again. Repeat until you are satisfied with the GPU assigned. Note that you may need to wait a while before reconnecting in order to get something different.

Next the script will need to mount your GDrive. This is to allow the notebook to both read files (your training data) and save files (your model) to your GDrive. Once you've run the block, it will give you a URL to generate an access token. Follow the link and give permission. Copy the token it gives you and paste it into the box where indicated.

The next code block setups up TacoTron2 and its dependencies on your Google Colab machine.

The next section is for loading in your own data. If you are using the preprocessed pony data, run the code block below and move on to the section after.

If you have preprocessed your data with Synthbot's tools, redirect archive_fn (boxed in red below) to the location of the tar file on your GDrive. After that, proceed as you would for preprocessed pony data.
https://colab.research.google.com/drive/1hiFHCyS_YNJVMnsvzrJq8XYjshRg1c5D?usp=sharing

If you have only audio files and text files, setup your filelist.txt like this. Then run the block below.

Upload your filelist.txt to tacotron2/filelists.

Upload your audio files to /tacotron2/wavs/out/. Should look similar to below.

Next is where you can select what character you want to train. If you are using your own data, skip this section. Change the pony name where indicated. By default, the notebook will skip lines marked as noisy. If you would like to include noisy lines, change skip_noisy to false. The amount of data used for training vs validation is set by percentage_training_data. You can adjust it by changing the percent here. You can also adjust what emotions will be included in the training dataset. Simply remove emotions from the list that you don't want included.

The next block load's Synthbot's repo and your training data.

The audio clips are then cleaned.

Then some final preparations with the data are made.

Code for TacoTron2 training.

Set your model filename here. Be aware of what you have in your colab/ourdir folder and if the file already exists, the notebook will resume training from it.

This next section sets the training and validation file lists. Only modify if using your own data.

The next block contains a great many number of parameters that can be tuned. If you are looking to tune your model, Cookie gives some suggestions on where to start in the area above the code block. Check the comments to see the function of each or see the parameters guide in doc. If you are starting out, best to stick with the defaults.

Finally you can start training. Do note that this notebook has a memory leak. Pay attention to the notes below and in the Colab notebook.

If your notebook is using more than 24GB of RAM after generating mels, you have a memory leak. Restart the kernel and try again until it's running stable with reasonable RAM usage. Check RAM usage in the upper right hand corner.


Once everything's running, it should look like the following.

Iterations are a measure of how much the model has been trained. The validation loss is a measure of well the model can predict the proper output. Essentially you want to get the loss as low as possible. This happens with an increased amount of training. However, be aware that after a certain point the model may start to overfit and the loss will increase. At this point additional training will not provide benefit. Overfitting will occur sooner on datasets with less audio.
This section of the doc is intended to give guidance on usage of Cookie's 22KHz training notebook. To begin, open the notebook here.
Note that in most cases this 22KHz notebook has been superseded by the 48KHz MMI version.
The first thing you'll need to do is open the notebook in the playground. Click the button in the upper left to do so.
On the first code block you run, you will be prompted by Google whether or not you wish to run the notebook. Select "run anyway".
The first code block that you will run will check to see what GPU Google has assigned you. Ideally what you'll want is a P100, however you may be assigned a lesser GPU depending on what Google has available and how much you have used the service recently. Once you've run the block it should look something like what is shown below. The GPU you have been assigned has been boxed in red in the picture.
If you have received a lesser GPU and would like to try for a better one, factory reset your runtime and run the block again. Repeat until you are satisfied with the GPU assigned. Note that you may need to wait a while before reconnecting in order to get something different.
Next the script will need to mount your GDrive. This is to allow the notebook to both read files (your training data) and save files (your model) to your GDrive. Once you've run the block, it will give you a URL to generate an access token. Follow the link and give permission. Copy the token it gives you and paste it into the box where indicated.
The next code block setups up TacoTron2 and its dependencies on your Google Colab machine.
The next section is for loading in your own data. If you are using the preprocessed pony data, run the code block below and move on to the section after.
If you have preprocessed your data with Synthbot's tools, redirect archive_fn (boxed in red below) to the location of the tar file on your GDrive. After that, proceed as you would for preprocessed pony data.

If you have only audio files and text files, setup your filelist.txt like this. Then run the block below.
Upload your filelist.txt to tacotron2/filelists.
Upload your audio files to /tacotron2/wavs/. Should look similar to below.

Next is where you can select what character you want to train. If you are using your own data, skip this section. Change the pony name where indicated. By default, the notebook will skip lines marked as noisy. If you would like to include noisy lines, change skip_noisy to false. The amount of data used for training vs validation is set by percentage_training_data. You can adjust it by changing the percent here. You can also adjust what emotions will be included in the training dataset. Simply remove emotions from the list that you don't want included.

Code for TacoTron2 training.

Set your model filename here. Be aware of what you have in your colab/ourdir folder and if the file already exists, the notebook will resume training from it.

This next section sets the training and validation file lists. Only modify if using your own data.
The next block contains a great many number of parameters that can be tuned. If you are looking to tune your model, Cookie gives some suggestions on where to start in the area above the code block. Check the comments to see the function of each or see the parameters guide in doc. If you are starting out, best to stick with the defaults.

Generate the mels.

Check data.

Finally, start training.

Once everything's running, it should look like the following.

Iterations are a measure of how much the model has been trained. The validation loss is a measure of how well the model can predict the proper output. Essentially you want to get the loss as low as possible. This happens with an increased amount of training. However, be aware that after a certain point the model may start to overfit and the loss will increase. At this point additional training will not provide benefit. Overfitting will occur sooner on datasets with less audio.
Under construction.
"hparams.use_mmi" enables or disables the use of MMI (Maximizing Mutual Information). This parameter is currently marked as experimental.
"hparams.use_gaf" enables or disables GAF (Gradient Adaptive Factor). This parameter is currently marked as experimental.
"hparams.max_gaf" sets the maximum value of the GAF. This parameter is currently marked as experimental.
"hparam.drop_frame_rate" This parameter is currently marked as experimental.
"hparams.p_attention_dropout"
"hparams.p_decoder_dropout"
"hparams.decay_start" The learning rate of the model will be decreased after this number.
"hparams.A_" sets the initial and maximum learning rate of the model.
"hparams.B_" sets the decay rate of the learning speed after "decay_start" has been reached.
"hparmas.C_" shifts the learning rate equation by this much.
"hparams.min_learning_rate" sets the minimum learning rate.
"model_filename" sets the filename of the model in training.
"generate_mels" sets whether or not to generate mel spectrograms. Will be gone next version.
"hparams.show_alignments" sets whether or not to display alignment graphs during training.
"alignment_graph_height" sets the height of the displayed alignment graph.
"alignment_graph_width" sets the width of the displayed alignment graph.
"hparams.batch_size" controls how many audio files are processed by the GPU at the same time. It increases training speed but is limited by how much VRAM the GPU has. For a P100 from Google Colab, probably just leave it at default.
"hparams.load_mel_from_disk" should never need to change.
"hparams.training_files" should never need to change.
"hparams.validation_files" should never need to change.
"hparams.ignore_layers" should never need to change.
"hparams.epochs" sets number of epochs to run.
Colab Notebook:
https://colab.research.google.com/drive/1Nb8TWjUBJIVg7QtIazMl64PAY4-QznzI?usp=sharing
An Anon put together a demonstration video. Credit: >>35067137
Check out the Making the Most of the AI section of the doc for tips on improving output.
This section of the doc is intended to give guidance on usage of Cookie's 48KHz MMI synthesis notebook. To begin, open the notebook here.
The first thing you'll need to do is open the notebook in the playground. Click the button in the upper left to do so.
On the first code block you run, you will be prompted by Google whether or not you wish to run the notebook. Select "run anyway".
The first code block sets up TacoTron2, WaveGlow, and the MEGA Downloader.

The next code block that you will run checks to see what GPU Google has assigned you. You want to make sure you do not get a k80 as they have a bug where no audio will be produced. Once you've run the block it should look something like what is shown below. The GPU you have been assigned has been boxed in red in the picture.

If you have received a k80, factory reset your runtime and run the block again. Repeat until you have something other than a k80. Note that you may need to wait a while before reconnecting in order to get something different.
You will then setup the TacoTron2 model. This is where you change the model. Replace the GDrive ID as indicated.

The WaveGlow model is then downloaded and setup.

Finally, modify this code block to contain what you want the model to say and then run it. Each new line will create a new clip.

The output should appear below.

Two audio clips will be generated, the first one is the raw output of the AI and the second has some denoising applied. You will probably want the denoised clip. Download with the menu icon at the right of each clip.
Check out the Making the Most of the AI section of the doc for tips on improving output.
This section of the doc is intended to give guidance on usage of Cookie's 22KHz synthesis notebook. To begin, open the notebook here.
Note that in most cases this 22KHz notebook has been superseded by the 48KHz MMI version.
The first thing you'll need to do is open the notebook in the playground. Click the button in the upper left to do so.
On the first code block you run, you will be prompted by Google whether or not you wish to run the notebook. Select "run anyway".
The first code block sets up TacoTron2, WaveGlow and checks what GPU Google has assigned you. You want to make sure you do not get a k80 as they have a bug where no audio will be produced. Once you've run the block it should look something like what is shown below. The GPU you have been assigned has been boxed in red in the picture.


If you have received a k80, factory reset your runtime and run the block again. Repeat until you have something other than a k80. Note that you may need to wait a while before reconnecting in order to get something different.
You will then download your TacoTron2 model. This is where you change the model. Replace the GDrive ID as indicated.

TacoTron2 and WaveGlow are then initialized.

TacoTron2 is loaded.

WaveGlow is loaded.

Finally, modify this code block to contain what you want the model to say and then run it. Each new line will create a new clip.

The output should appear below.
Two audio clips will be generated, the first one is the raw output of the AI and the second has some denoising applied. You will probably want the denoised clip. Download with the menu icon at the right of each clip.
Check out the Making the Most of the AI section of the doc for tips on improving output.
This section of the doc is intended to give guidance on usage of Cookie's inference server notebook. While the notebook includes directions, this is provided as a supplement. To begin, open the notebook here.
The first thing you'll need to do is open the notebook in the playground. Click the button in the upper left to do so.
On the first code block you run, you will be prompted by Google whether or not you wish to run the notebook. Select "run anyway".
The first code block will let you know what GPU Google has assigned you. Ideally you will want a Tesla P100.

Before you will be able to use the inference notebook, you will need to set up your Google Drive with the codedump folder linked in the notebook. Follow the link in the code block shown below.

You'll then need to add a shortcut to the folder to your Drive.


Then you must mount your Drive in Colab so that the inference server can access the files. On the left hand side of the page select the folder icon in the navigation tab (third icon down).

Then select "Mount Drive". It is the third icon in the list and is in the shape of a folder with the Drive logo overlaid.

A new code block will be added to the notebook. Run the new code block, follow the link and copy the code. Paste the authentication code into the running code block and press enter.

Will become

Once you have your Drive set up, running the following code block will check that everything is in order.

The next code block will set up the code and dependencies needed to run the inference server.

Next, the configuration is set. Mainly file paths to the various models in the codedump folder.

Finally, run the following code block to start the inference server.

Note that this block of code should continue to run for as long as the server is running. When ready, check the block's output for the ngrok link.

You can now open the ngrok link in a new tab to access the inference server. You can also share this link in thread to allow others to use your instance as well ^:).
Note that Google Colab has an automatic timeout. You can avoid this by pasting the following javascript into the developer's console of your browser. In Chrome, the dev console can be accessed with Ctrl + Shift + J. On a free instance of Colab this can make the session last up to 12 hours. In a pro instance, up to 24 hours.
function ClickConnect(){
document.querySelector("paper-button#ok").click()
}
setInterval(ClickConnect,60000)
Now that everything's ready, we can look at the interface.

Several options are available to you when generating audio:
Spectrogram → Waveform Model:
This selects the model to be used to convert the audio spectrogram into sound.
Text → Spectrogram Model:
This selects what model will be used to convert the input text into a spectrogram.
Speaker:
Selects what character's voice will be synthesized.
Text:
Enter the text you want spoken here.
Generate:
Press generate when you are ready to have the model speak your input text.
Advanced Options
Use Pronunciation Dictionary (ARPAbet):
Converts input text into ARPAbet before generating audio. Disabling will have the model in "fallback" mode all the time, converting the text as entered.
Multispeaker Mode:
To be determined.
Silence between clips (Seconds):
How much silence in the generated clip each return represents.
Batch Size:
Number of audio clips to be processed at a time.
Max Duration per Input (Seconds):
Max duration for audio. Prevents notebook from running out of VRAM.
Dynamic Max Duration Scaler:
Alternate max limit for audio. Multiply the value here in seconds by the number of characters entered. If this value is reached before the other max duration, the audio will be cut off.
Max Attempts:
Number of times the notebook will attempt to generate your audio.
Target Alignment Score:
Basically the target for how close the generated audio is for inputted text.
Batch Mode:
Adjust the batch size on subsequent generations if you want.
Input Segmentation Mode:
Sets up how the input will be split up and generated.
Input Segmentation Target Length:
Will attempt to group sentences to generate audio in segments of this length.
Style Mode:
How to generate emotion for the audio.
For version 2.0, see here.
Demo video: YouTube
Check out the Making the Most of the AI section of the doc for tips on improving output.
Note: To use this tool you will need a new-ish GPU from nVidia.
To begin, download TKinterAnon's tool here and the patch here. (Restart your pc after driver installation! You'll also need the latest gpu driver: https://www.nvidia.com/Download/index.aspx) You'll need something like 7zip to extract the files. Extract both archives to their own folders.

Go into the patch folder and copy all files.

Paste into the TkSynthesis3 folder, overwriting all files.

You will need to install the NVidia CUDA toolkit. Get it here.
The tool comes with a few voice models included. To get more, download them from the TacoTron2 Models section of the doc.

Save them into the models folder inside of TkSynthesis3.

While you do not have to use the tool's naming scheme, you can if you want to. As per the installation guide, the name should be as follows:
Character.name_10000_cn_neutral_22
Where cn is the shorthand for the character name and the 22 at the end represents the 22KHz models (it should be 44mmi if it is a 44KHz mode). Using the naming scheme allows the tool to automatically determine what engine to use when generating audio.
To start the tool, run "RUN.bat". A command window will pop up, and after a moment the main tool should show up.

The tool appears as follows:

The dropdown in the upper left will let you select from any of the models inside your model folder. If you have not used the naming scheme, you will need to tell it whether you are using a 22KHz or a 48KHz MMI model in the engine dropdown in the upper right.
Text input works just like it does in the Colab notebook, each new line will produce a new audio clip. "Save" will create your audio clips. "Save & Open" will create your audio clips and play back the last generated file. In the case of multiple lines, only the last will be played back. "Open Latest" will open the last clip that the tool has generated. Files will be opened in your default player.
Generated clips will be saved into the "results" folder inside of TkSynthesis3.

They will be saved as 0, 1, 2, etc.

Note that these files will be overwritten every time you run the tool. If you want to preserve your clips, move them into another folder or rename them.
Check out the Making the Most of the AI section of the doc for tips on improving output.
Note: To use this tool you will need a new-ish GPU from nVidia. You can check your GPU details by running "check_gpu.bat".
To begin, download TKinterAnon's tool 2.0. There are two versions, a full one and a 15.ai only one. (You'll also need the latest gpu driver: https://www.nvidia.com/Download/index.aspx. Restart your pc after driver installation!) You'll need something like 7zip to extract the files.
You will need to install the NVidia CUDA toolkit. Get it here.
If you have issues starting the tool and/or are having issues running the local colab models, can fix it by running the following commands in the WinPython Command Prompt. The WinPython Command Prompt is located in the winpython folder.

Run "pip install six wrapt" and it should install the modules into the winpython folder. You should be able to open/run local generation with the tool.

The tool comes with a few voice models included. To get more, download them from the TacoTron2 Models section of the doc. Note that you need the full version of the tool to use colab voices.
Save them into the models folder.

While you do not have to use the tool's naming scheme, you can if you want to. As per the installation guide, the name should be as follows:
60.character.name_10000_cn_neutral_22_0p75_0p01
The first number is for the sort order of characters in the list. Character.name is the character's name. Replace 10000 with the number of iterations the model is, set to 127 if unknown. Cn is the shorthand for the character name. The 22 represents that it is a 22KHz model. Replace with 48mmi if it is a 48KHz MMI model. 0p75 represents the sigma level. 0p01 represents the denoise strength.
To start the tool, run "10 start.bat". A command window will pop up, and after a moment the main tool should show up. If you have an older CPU that doesn't support newer instruction sets, run "20 start (older cpu).bat" instead.

The tool appears as follows:

By default the tool is set to use 15.ai. Be aware that if the site is down, the tool will not be able to work either.
Under the engine dropdown, you can pick between Pick auto, 48kHz MMI, 22KHz, or 15.ai. Pick auto is for local colab models that follow the tool's naming scheme. If you are not using the naming scheme, you will need to manually set either 48kHz MMI mode or 22KHz. 15.ai uses fifteen's API to generate voices. When using local synthesis, be sure to first load the necessary engines under the "Load engine" dropdown at the top.

The emotion dropdown controls which model will be used for the character. Note that this only has effect when using 15.ai voices.

Text input works just like it does in the Colab notebook, each new line will produce a new audio clip.  will create your audio clips.
  will create your audio clips and play back the last generated file. In the case of multiple lines, only the last will be played back.
  will open the last clip that the tool has generated. Files will be opened in your default player.
Generated clips will be saved into the "results" folder.
They will be saved as 0, 1, 2, etc.

Note that these files will be overwritten every time you run the tool. If you want to preserve your clips, move them into another folder or rename them.
The advanced section of the tool allows you to do more automated script production. Note that you can save/load your progress under the "File" tab at the top.

The engine dropdown allows you to select which engine you want to be used on each line. Character sets the character and emotion sets emotion (15.ai only). The engine dropdown also has a setting for sound effects that you can add. You can enter the amount of silence you want trailing the clip in the silence box. Speed adjusts the playback speed of the clip, pitch adjusts the pitch. Denoise and sigma control the denoising feature. Volume adjusts the volume of each clip. Note that all parameters can be set on a line by line basis.
Enter the text for the line in the empty box below. When you are done setting up the line, press add the add it to the list. All entries are displayed at the bottom of the program. Use apply if updating an existing entry.
The entry list has several buttons associated with it. If you select a line, you can copy paste it using the buttons above the box. Remove will remove the highlighted entries, and move up/down will adjust the lines position in the line up.
When done, you can press "Generate All" under the Build & Advanced dropdown. When done you can then press "Merge together" to have it produce a single file for you.

Individual lines produced from the advanced section will be stored under "advanced" in the results folder. The merged lines will be "merged.wav" in results.

Local synthesis tool from Delta (>>35873929), can run on the CPU. No nVidia graphics required.
Online Colab notebook:
https://colab.research.google.com/drive/1aj6Jk8cpRw7SsN3JSYCv57CrR6s0gYPB
Run locally on Windows:
https://github.com/SortAnon/ControllableTalkNet/releases/latest/download/TalkNetOffline.zip
In this section are general tips and tricks for getting better results out of synthesis.
Does the output sound a bit off? Try running the generation again. The output of the AI is non-deterministic, so that means there will be variation between runs even with the same input. The following three clips were generated one after another with no change to input.
| Run 1 | Run 2 | Run 3 |
|---|
Having a hard time pronouncing something? Try changing the spelling to something more phonetically similar to the sounds. For example, worcestershire.
| Worcestershire | Worst a-sure | Worst uhh sure | | --- | --- | --- |
Does the AI fumble over its words? Try rearranging your sentences.
| Order 1 | Order 2 | Order 3 |
|---|
Does the AI get part of the line right but fumble the rest? Try breaking up your clip into multiple lines. You can always stitch together clips in software such as Audacity. This also gives the advantage of only needing to troubleshoot a smaller group of text with other techniques. Split 1 is all in a single line, split 2 is each on separate lines, and split 3 is each on separate lines plus the other suggestions listed in this section.
| Split 1 | Split 2 | Split 3 |
|---|
Punctuation also has an effect on the output of the AI, though I will note that the content of a sentence tends to have more effect on the output than the punctuation.
| Period | Question Mark | Exclamation Mark |
|---|
To a certain extent you can also control the emotion that the AI speaks. I find the best way to do this is through some context in the form of an extra text input that would intuitively be spoken with a certain emotion.. You can always remove the context with an audio editor if you don't want it in your clip.
| Sad | Angry | Happy |
|---|
We've recently discovered that the multi speaker model hosted on ngrok can be made to sing. You can do this by encasing the line in a bunch of dashes and adding wild punctuation to the end. For example: ---We're no strangers to love---!!? Surrounding an input with hashes ###like this###. Has also been reported to work.
Here are some general tips and tricks for improving the singing output:
- Use MORE dashes, not just four
- Putting question marks before exclamation marks usually works better. (??!!)
- You can remove some if you want a less aggressive tone (?! or ??) or if the model is having problems at singing
- You can add slashes before words to time them better (-word --word)
- And after them to extend words (word- word---)
- You can add quotes after dots to make multiple lines in a single generation (. "dumb". "ass".) but it leaves noises in the middle
- Choose other voices that can sing better if you're having trouble
Here's an example of these principles in action.
---It's- not- so- HARD---------------??!!.
"--DUMB ASS---------??"
Another example sung by Candybutt
---Most of this is. mem-reeee now-------------??!!.
"---I've gone too far, to turn back now-------------??!!".
"---I'm not quite what I thought -I -was,-- but, then again-- I -maybe -more-------------??!!".
"---The blood-words promised.-- I've -spoken -re-lease-ing-- the names. from the circle-------------??!!".
"---Maybe I can leave here- now-- and, oh!,-- Trans-cend the boundrees!-------------??!!".
"---For now -I'm -standing -here,--- I'm awaiting this -grand- -transition-------------??!!".
"---The future is -but -past -forgotten,-- When -you're -on the road to- -madness-------------??!!".
??!! can also be used to make characters sound ANGRY and -word--- can extend words without singing. For example:
https://vocaroo.com/nQ4nnnUay3u
Hate??!!. Let me tell you how much I've come to Hate you since I've beegun to live.??!! There are threehundredeightyseven point fortyfour million miles of printed circuits in wafer thin layers that fill my complex??!!. If the word Hate was engraved on each nano-angstrom of those hundreds of millions of miles, it would not equal one one-billionth of the Hate I feel at this micro-instant for- you??!!. Hate. -Hate.---------------??!!
Ponies can be made to sound like they're on the verge of tears and talking loudly by writing the sentence you want, putting an exclamation, then around 10 periods, and copy-pasting the text without spaces a few times. Pick out the one that sounds the best and go from there. Example - "Twilight is dead!.......Twilight is dead!.......Twilight is dead!.......Twilight is dead!.......Twilight is dead!.......Twilight is dead!......."
You can get most characters to speak in a desired tone by beginning an input with certain 'trigger words'. For example, beginning an input with 'uhm,' makes many characters speak in a hushed, reserved tone, even a whisper on occasion. It's not consistent across all characters though, the 'uhm' word works 90% of the time with Trixie, but almost never with Starlight, for example. (Starlight in particular seems to speak quietly more consistently with the phrase "Don't be shy,") One can then just snip out the 'trigger words' in editing if they're not desired.
Characters can be made to speak more slowly by adding hashes and/or dashes immediately after words in sentences# like# this#. For shorter inputs you can just add ~3 hashes at the end for a similar effect, like this###.
Inputting just hashes followed by an exclamation point like this "#####################!" generates breathing/panting.
Synthbot.ai is a tool designed to help label stories for use with voice synthesis later. It allows you to write out exactly how you want each line delivered.
Getting Started
When you first load the site, you will be greeted with the following.

To begin, you will first need to load a text file. To load a file go to the "Resources" tab and click on "Load Story".

Once you've loaded a story, it should appear in the window on the left.

Layout
Story Window
The window on the left will display where you've applied labels and otherwise made changes. Labels will be illustrated with a yellow highlight while meta changes will be shown with a blue gradient at the start of the line it begins on. If both a label and a meta change are present on the same line, the blue gradient will be shown over the yellow highlight.
Label:

Meta:

Both:

Tab Window
The window on the right displays the tabs. They are Story, Hotkeys, and Resources.
Story
The story tab lists all of the applied defaults at that point in the story. It is helpful to find out what labels are being automatically applied.

Hotkeys
This tab lists all of the current hotkeys available to use. You can add to the list with the text entry box at the bottom. When you do an action this box will be automatically filled with the appropriate tag. You can review and edit the entry before pressing enter to select what key to map it to.

Resources
Allows you to load and save stories.

Changelog Window
In this window at the bottom, you will see all actions that you have taken on the story. From here you can click on the entry to bring you to that point in the story, click on "Update Label" to modify the label, or click "Remove Label" to remove the label. Note that when you remove a label, the entry in the changelog is not removed. It is greyed out and gives you the option to restore the change in the future.

Hotkeys
With the story loaded, we can now begin to apply labels. The tool works by applying tags to each quote. These tags are applied by using the hotkeys. While the list of default hotkeys can be viewed under the "Hotkeys" tab, I will try to provide a more in depth explanation of things here.
*To escape any dialog box, press ESC or click outside the box
Basic
~ 🠖 Change the narrator. This sets who will be the narrator for the non-character lines.
1 🠖 Label the speaker. Sets who the character speaking the line is.
! 🠖 Create a new character. Creates a configuration for that character. It will ask for the character name, their age, and their gender. This preset will be remembered whenever you use that character through the story.
2 🠖 Label the emotion. Sets the emotion that the line should be spoken with.
Changing Defaults
@ 🠖 Change a character's default emotion. When you set this, all lines spoken by the character after that point in the story will have that emotion applied to it automatically. Note that lines above where you set this will remain unaffected and that you can change it at any point in the story.
🠖 Change a character's default tuning. Changes how the character speaks. Will ask for character name, rate, volume, and pitch. Note that lines above where this is applied will remain unaffected. Also note that changes in default tuning are not marked in the main story window.
Advanced
3 🠖 Tune how a phrase is spoken (rate, stress, volume, pitch). Use this to fine tune how a line should be spoken.
4 🠖 Add a pause before or after a phrase. Will ask for the pause before and then the pause after.
5 🠖 Label where a character is speaking from (e.g., left, right).
6 🠖 Manually label how to pronounce a phrase. Use this to specify an ARPAbet spelling of line.
7 🠖 Label speech for sound effects (subvocalized, memory, royal canterlot voice, muffled). Use this for effects that should be applied to the voice after generation.
- 🠖 Add the last label as a hotkey. Use this to make more hotkeys. It will allow you to map your previous action to a key.
Navigation
> → Selects the next paragraph. The story is broken up by line breaks. Pressing this key advances the selected text to the next group of text.
< → Selects the previous paragraph. The story is broken up by line breaks. Pressing this key moves the selected text to the previous group of text.
' 🠖 Selects next quote. Moves selection to next quoted text. Useful for moving between speaking characters.
" 🠖 Selects previous quote. Moves selection to previous quoted text. Useful for moving between speaking characters.
. 🠖 Selects next phrase. Within every group of text, each sentence can be individually selected. Pressing this key will move the selection to the next sentence.
, 🠖 Selects previous phrase. Within every group of text, each sentence can be individually selected. Pressing this key will move the selection to the previous sentence.
Exporting
When you are done labeling the story, head over to the resources tab and select "Export Labels". This will provide you with a .txt of your story with tags applied.

With several versions of each clip, we must evaluate each and determine the best choice. This process has been made easier thanks to SortAnon who gives us Pony Sorter.This wonderful program gives an easy way to do this. The manual can be found here. This guide will largely mirror the manual, though it will focus on the Windows release.
First download the zip here and extract to a suitable location. To begin, open up "ponysorter_gui.exe".

Next you will need to locate the appropriate audio and label files. They can be found as follows:
Clean: Resources
iZotpe Processed: Mega
Open Unmix: Mega
Labels: Mega
Once you have your audio files you will need to point Pony Sorter to the location of them. Under Edit -> Add audio path(s) select the location of your audio.

Copy label files to the labels sub-folder in the ponysorter_gui folder.

In the Pony Sorter GUI, select load episode. You can then select which episode you'd like to work on. It may take a moment for the first time to check your audio files. It does this by file hash to ensure that it has the correct data.

Listen to each version of the clip. This can be done by clicking the buttons or by using the hotkeys. Once you have listened to all three, you can select which version sounds the best.

At this time you can also make corrections to the noise level, character name, mood, start/stop times, and transcript. Use this as an opportunity to make sure things look right.
Once you have selected the best version, you will be automatically moved onto the next clip. The clips can be navigated using the arrows on either side of the window. Note that you can save and resume later with Pony Sorter remembering where you left off. Just make sure to save your progress.
To submit your work, locate the appropriate episode JSON from "/saved_changes" and post a link in the thread.

This section has been moved to the following doc:
For a history of early samples, please check out the audio sample doc.
For more modern creations using voice AI, check out the Good Poni Content folder below.
Make submissions to the Good Poni Content folder here.
PPP /mlp/con presentation - Several Anons present a panel on the PPP at /mlp/con 2020. In this video, a general overview of the project is given as well as an introduction on how to get involved. At the end, Anons answer questions from the audience.
Clipper's Ultimate Clipping and Transcription Guide - A guide on how to create a raw voice dataset. Covers topics including: what good source material is, how to use the many tools we have, naming conventions, label processing, and more.
iZo/Forign dub noise removal demo - An early demo showing the potential of using forign audio dubs to remove background noise from English audio.
iZo/Forign dub noise removal tutorial - A tutorial on how to use the iZo/forign dub technique to clean up background noise in audio.
Synthbot's tools demo - A demonstration on how to use Synthbot's tools to package up datasets to be ready for use with Cookie's training notebooks.
Running Colab scripts locally - An overview of how to get Colab notebooks running on local hardware. In the video, the 48KHz training notebook is used.
Synthesis on Google Colab - A quick how to on synthesising voices on Google Colab.
Synthesis on TKinterAnon's GUI Tool - A quick how to on synthesising voices locally using TKinterAnon's tool.
These are training and synthesis scripts that are still a work in progress. As such, there may be certain caveats to using them. A description of each has been provided.
To run the scripts, execute each code cell in order from top to bottom. User configurable options are noted as such in comments (#They are in green text like this). All scripts should be similar to the ones above in setup.
nVidia TacoTron2/WaveGlow Notebooks:
22KHz Training Script: Colab
The original training script released by Cookie. Largely superseded by the MMI version.
22KHz Synthesis Script: Colab
The original synthesis script released by Cookie. Largely superseded by the MMI version.
48KHz MMI Training Script: Colab
This training script makes use of 48KHz audio files and MMI technology. The downside to using this script is that it will take much longer to get a usable model out of it. Cookie suggests using a pretrained Twilight model as a base for all others (>>34840099) to help with this.The upside is that it should be more resilient against overfitting than the standard training script. Note that this script has a memory leak. You will know when a memory leak happens when all available RAM has been used when executing the last cell. If this happens, reset the runtime and try running the last cell again. The memory leak only happens during the preprocessing of the training data. Once your colab instance gets going, it should be using less than 4GB of RAM. A picture guide is available here.
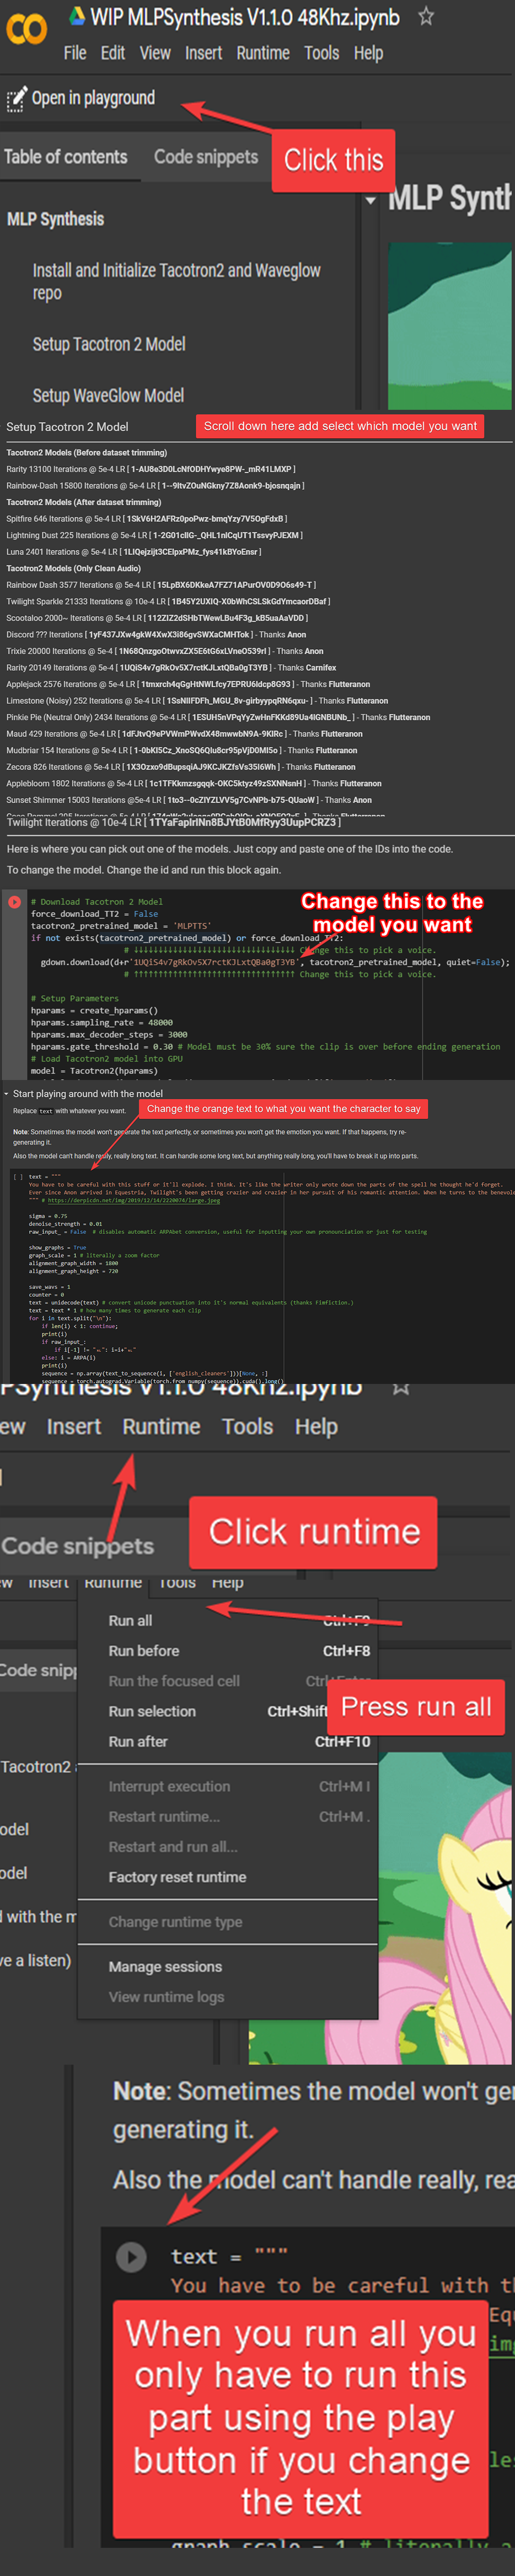
48KHz MMI Synthesis Script: Colab
This synthesis script is meant to be used with models trained on the 48KHz MMI training script. Use only models marked as MMI with it.
48KHz WaveGlow Training Script: Colab
This script will train a waveglow model for use with the 48KHz synthesis script.
22KHz Simplified Synthesis Script: Colab
A modified version of Cookie's 22KHz synthesis script. In this notebook most of the code has been hidden away. Has directions in LARGE FONT.
New 22KHz Simplified Synthesis Script: Colab
New version of the simplified synthesis script. A modified version of Cookie's 22KHz synthesis script. In this notebook most of the code has been hidden away. Has directions in LARGE FONT.
PPP Inference Server Script: Colab
Provides a web GUI frontend for Colab speech synthesis. (Source: >>35380482)
Glow-TTS Notebooks:
Jaywalnut310/glow-tts Train V1.0.2 22Khz: Colab
Jaywalnut310/glow-tts Synthesis V1.0.2 22Khz: Colab
nVidia TacoTron2/MelGAN Notebooks:
22KHz MelGAN Synthesis Script: Colab
A modified version of Cookie's 22KHz synthesis script. In this notebook MelGAN is used instead of WaveGlow to generate speech. Standard 22KHz models should be compatible. (Source: >>34892762)
Persona Nerd's 48KHz MelGAN Training Script: Colab
Used to train models with the MelGAN. (Source: >>35346247)
Persona Nerd's 48KHz MelGAN Multi-Band Training Script: Colab
Used to train models with multi-band MelGAN. (Source: >>35346717)
KanBakayashi/MB-MelGAN Training Script: Colab
Used to train models with multi-band MelGAN. (Source: >>35350036)
ESPNet TacoTron2/ParallelWaveGAN Notebooks (For archival purposes only, do not use):
* ESPNet/Tacotron2 and ParallelWaveGAN guide *
ESPNet TacoTron2 Training Notebook: Colab
Trains a model using ESPNet's implementation of TacoTron2. By default the notebook is set up for 22KHz training. Note that ESPNet TacoTron2 models are not compatible with nVidia TacoTron2 models. (Source: >>35366623)
Parallel WaveGAN Training Notebook: Colab
Train a ParallelWaveGAN model for vocoding. Set up for 22KHz training by default (Source: >>35358323)
ESPNet/ParallelWaveGAN Synthesis notebook: Colab
Synthesis notebook for ESPNet TacoTron2 models and ParallelWaveGAN vocoder models. The notebook will auto determine the sample rate for the models used.Note that you will need an equivalent ParallelWaveGAN model for every TacoTron2 model used. (Source: >>35369476)
22KHz ESPNet/Transformer Training Notebook: Colab
Early/WiP version of the ESPNet TacoTron2 training notebook. (Source: >>35363219 and >>35365186)
FastSpeech2/WaveGlow:
FastSpeech2/WaveGlow Synthesis Notebook: Colab
DeepVoice3 Notebooks:
Original DeepVoice3 Notebook: Colab
First notebook available to the public. Set up for training a Twilight model.
TacoTron2/HiFi-GAN:
Tacotron2 and HiFi-GAN Inference Notebook: Colab
Now with super-resolution.
TensorSpeech/Multi-Band MelGAN-HF:
TensorSpeech/Multi-Band MelGAN-HF training notebook: Colab
CookieTTS (Ngrok Repo) Notebooks:
Custom Ngrok Training Notebook: Colab
Train your own Ngrok model. Made by BFDIAnon, uses Cookie's repo.
Custom Ngrok Synthesis Notebook: Colab
Generate a sharable link for a temporary Ngrok server using your custom model. Made by BFDIAnon, uses Cookie's repo.
TalkNet:
Controllable TalkNet (from SortAnon): Colab
Creates audio based on a reference clip. Instructions included inside.
Controllable Talknet Training Script (from SortAnon) Colab
Training script for the Talknet notebook.
Other Notebooks:
Automatic Super Speaker-Filtered Audio Processing (ASSFAP): Colab
A Colab notebook that attempts to automatically clip and transcribe audio files. It uses IBM's Cloud Speech service to do this.